
Project Workspace Overview
Overview
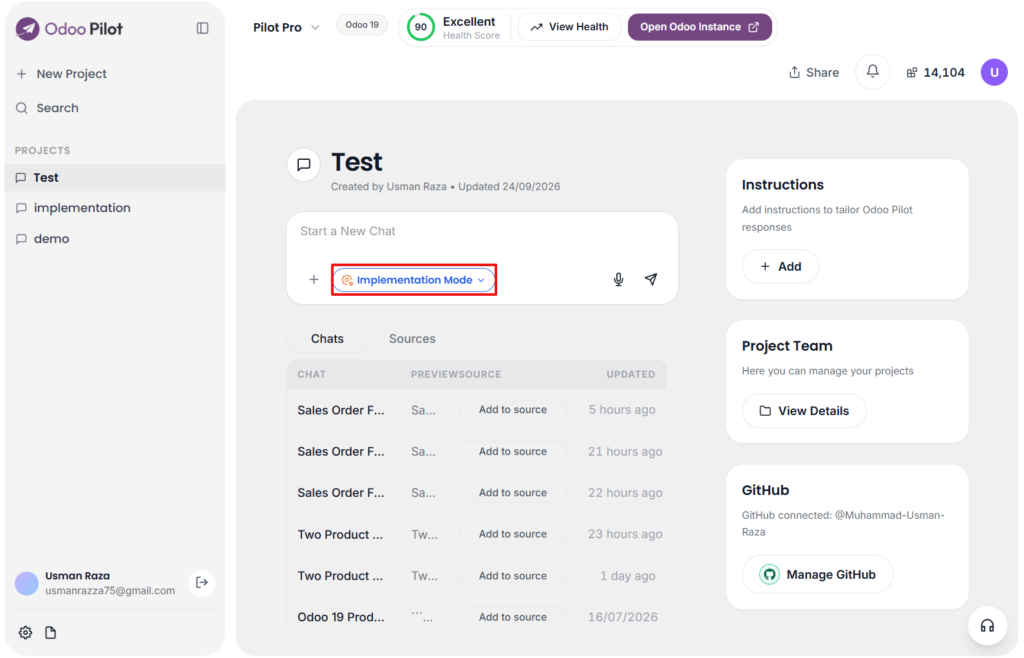
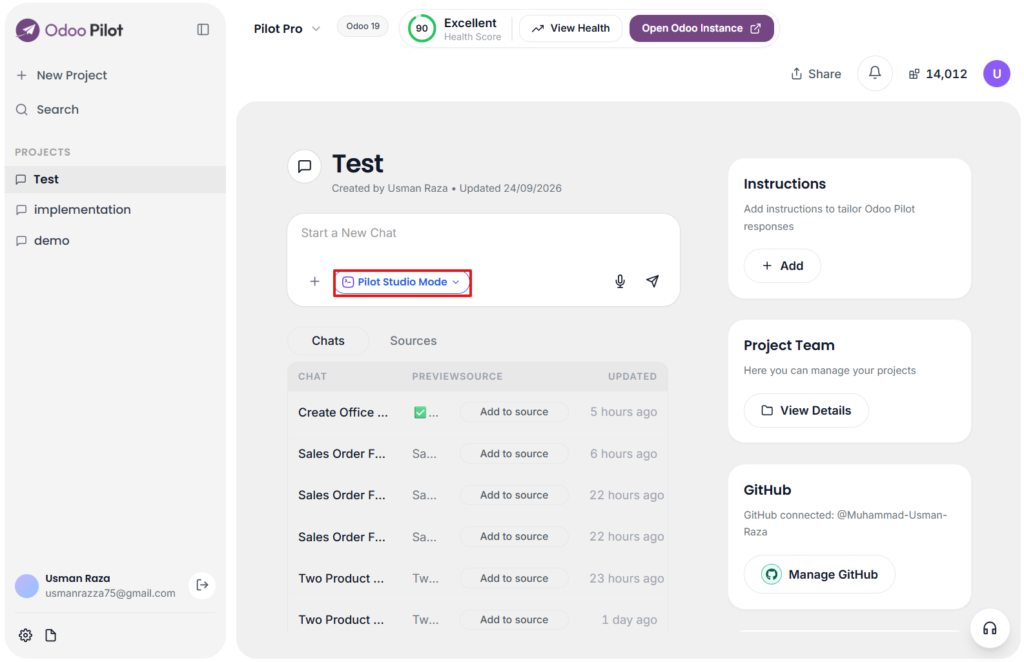
When you click a project from the left sidebar, Odoo Pilot opens the project workspace. This is the main working area where you can start new chats, select a mode, manage project tasks, add project instructions, invite team members, connect GitHub and connect a live Odoo database.
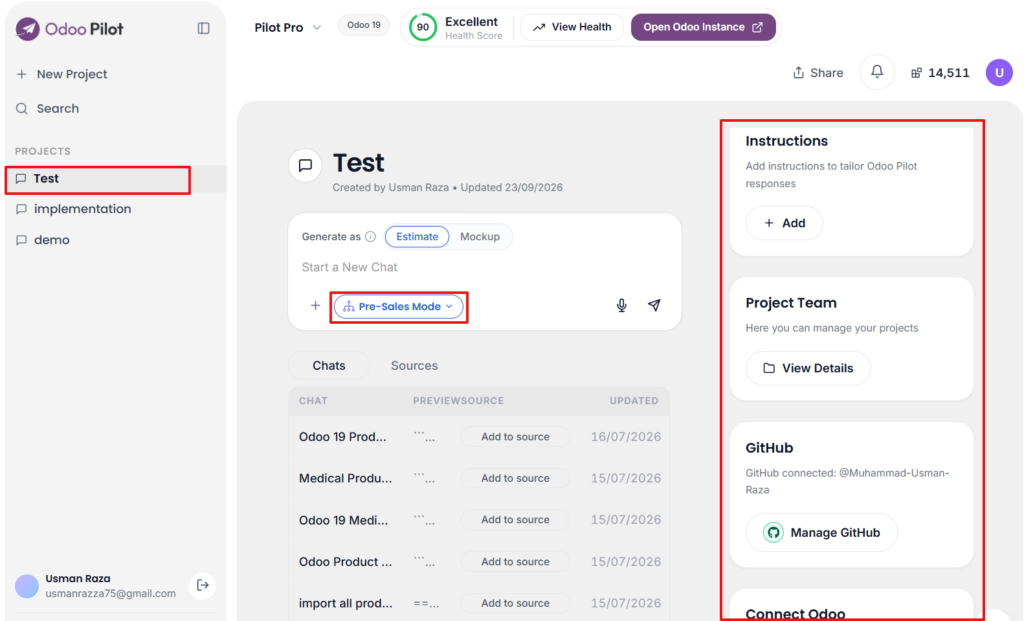
Each project has its own workspace, chats, instructions, team members, GitHub connection, and Odoo database connection.
Project Header
At the top of the workspace, you can see the project name, project owner, and last updated date.
This helps users confirm they are working inside the correct client or project workspace before starting a new task.
Left Sidebar
The left sidebar is used for navigation.
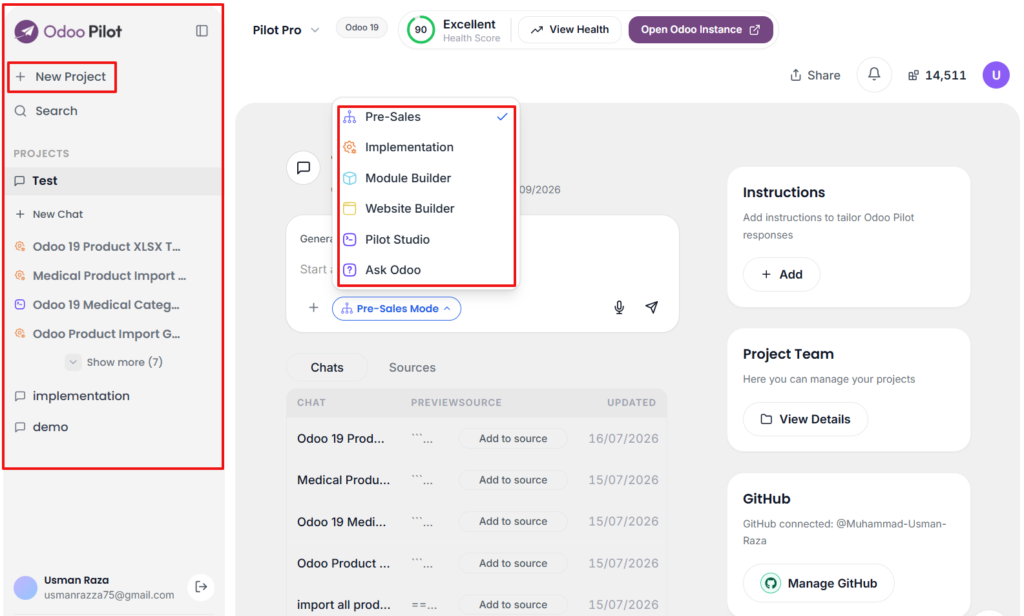
Users can:
- Create a new project
- Search across projects and chats
- Open an existing project
- Start a new chat inside the selected project
- Open previous chats or tasks related to that project
- Access account settings and support options
When a project is selected, the related chats and tasks appear under that project in the sidebar.
Start a New Chat
The main chat box allows users to start a new task inside the selected project.
Users can:
- Type a new requirement
- Upload files using the plus button
- Use voice input where supported
- Send the prompt
- Select the required mode before sending
Mode Selection
Below the chat box, users can select the required Odoo Pilot mode.
Available modes include:
- Pre-Sales
- Implementation
- Module Builder
- Website Builder
- Pilot Studio
- Ask Odoo
Important: Implementation Mode and Pilot Studio require a live Odoo database connection before they can execute work inside Odoo.
Right-Side Project Panel
The right-side panel contains project-level tools. These settings and files apply to the selected project only.
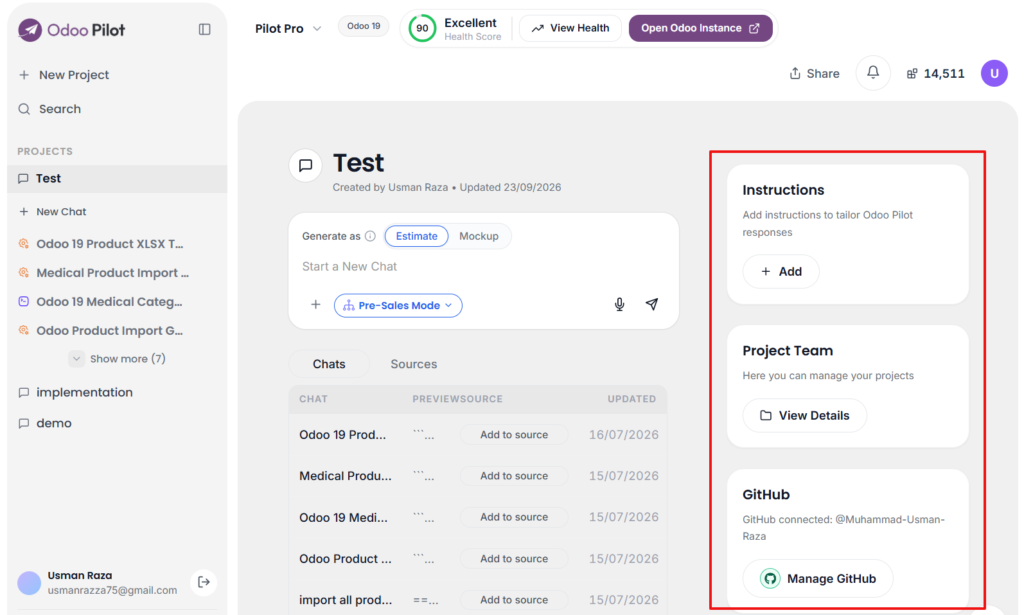
The main cards are:
- Instructions
- Project Team
- GitHub
- Connect Odoo / Update Project
Instructions
The Instructions section allows users to add project-specific instructions for Odoo Pilot.
These instructions are applied across all chats inside that project.
Users can add instructions such as:
- Always explain changes in simple business language.
- Follow Odoo best practices.
- Do not create duplicate records.
- Always ask before making changes in the live database.
- Maintain a professional tone for client-facing outputs.
This is useful when a project has specific rules, client preferences, coding standards, or implementation guidelines.
How to Add Project Instructions
- Click Add in the Instructions card.
- Enter the project instructions.
- Click Save.
Project Team
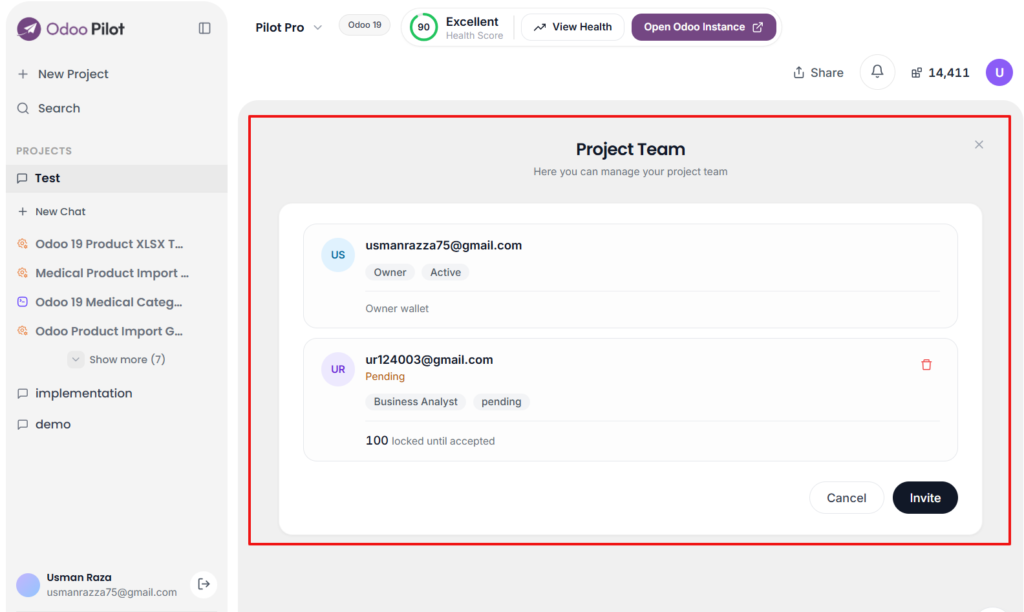
The Project Team section allows the project owner to manage users who have access to that specific project.
Users can:
- View current project members
- Invite a new team member by email
- Assign a role to the invited member
- See member status
- Remove an existing member from the project
This is useful when a project is shared between a project manager, business analyst, functional consultant, developer, or client-side team member.
Inviting a Team Member
To invite a user:
- Click View Details in the Project Team card.
- Click the invite option.
- Enter the team member’s email address.
- Select the correct role.
- Click Send Invite.
The invited user will receive an email with a secure invitation link when email delivery is configured.
Removing a Team Member
Existing project members can be removed from the Project Team screen by using the delete/remove option next to the member.
GitHub
The GitHub section allows users to connect a GitHub repository to the selected project.
This is mainly useful for:
- Module Builder
- Website Builder
- Custom Odoo modules
- Connector development
- Website module code
- Version control
- Pulling and pushing generated code
Users can link an existing repository or create a new repository for the project, depending on the available options.
GitHub Connection Flow
To use GitHub in a project:
- Connect GitHub from account settings if it is not already connected.
- Open the project workspace.
- Click Connect in the GitHub card.
- Link an existing repository or create a new one.
- Use the GitHub option in the code view to pull and push work.
Important: The GitHub repository is connected to the selected project only. Different projects can use different repositories.
Connect Odoo / Update Project
The Connect Odoo section is used to connect the selected project with a live Odoo database.
This connection is compulsory for:
- Implementation Mode
- Pilot Studio / Direct Mode
Without an Odoo connection, these modes cannot be accessible.
What the Odoo Connection Is Used For
The live Odoo connection allows Odoo Pilot to:
- Verify Odoo apps, models, and fields
- Check existing records
- Create or update approved records
- Execute implementation tasks
- Apply controlled customization
- Track execution results
- Show footprints
- Support rollback where available
How to Connect Odoo
- Click Update Project in the Connect Odoo card.
- Add or update the Odoo connection details.
- Enter the Odoo URL, database name, username, and required credentials.
- Test or verify the connection.
- Save the project.

After the Odoo database is connected, Implementation Mode and Pilot Studio can be used for supported execution tasks.
Best Practice
Use a staging or test Odoo database first before connecting a production database. For live production databases, review every task carefully before execution.
Creating Your First Project
Step 1: Create your account
Open Odoo Pilot and create an account using one of the available sign-in options:

- Email and password
Complete email verification for email-based signup.
Step 2: Review your plan and credits
After signing in, open the usage or account area to check:
- Current plan
- Available credits
- Usage history
- Upgrade options
- Billing information
Before running larger tasks, confirm that enough credits are available.
Step 3: Create a new project
Click New Project from the left sidebar or front of your screen.

Enter a clear project name, for example:
- Client CRM Implementation
- Odoo Sales Customization
- Product Import Testing
- Website Builder Demo
- ShipStation Connector Module
Step 4: Choose Odoo connection option
During project creation, select one of the available options:
- Connect Odoo Database
- Skip Odoo Connection

If connecting an Odoo database, provide:
- Deployment type
- Odoo URL
- Database name
- Username
- Password or access credential
Click Verify to test the connection, then save the project.
Step 5: Start working
Open the project, select a mode, write the requirement, upload any required files, and send the prompt.
Using Project Chats
Each chat belongs to a project and should be used for a specific task or topic. For example, one project can have separate chats for CRM setup, product import, website changes, and custom module generation.
Starting a New Chat
To start a new chat:
- Open the required project.
- Click New Chat.
- Select the correct mode.
- Type the requirement.
- Attach any required file.
- Click send.
Writing a Good Requirement
A good prompt should include:
- Odoo version
- App/module name
- Business requirement
- Required fields or records
- Expected result
- Whether to create or update
- Where the result should appear in Odoo
- Any screenshots, files, or examples
Understanding Responses
Odoo Pilot responses include:
- Requirement summary
- Planned steps
- Questions or missing details
- Generated task list
- Code preview
- Import template
- Mockup preview
- Execution result
- Footprints
- Next-step instructions
Stopping a Running Request
If a response is taking too long or the request was sent by mistake, use the stop or cancel button while the task is running. After stopping, edit the prompt and send a corrected request.
Managing Chats
From the chat menu, users can:
- Rename a chat
- Delete a chat
- Reopen a previous chat
- Continue earlier work
Pre-Sales Mode
Overview
Pre-Sales Mode is used before implementation starts. It helps teams understand client requirements, prepare scope, estimate effort, define timelines, identify risks, and create mockups for client discussions.
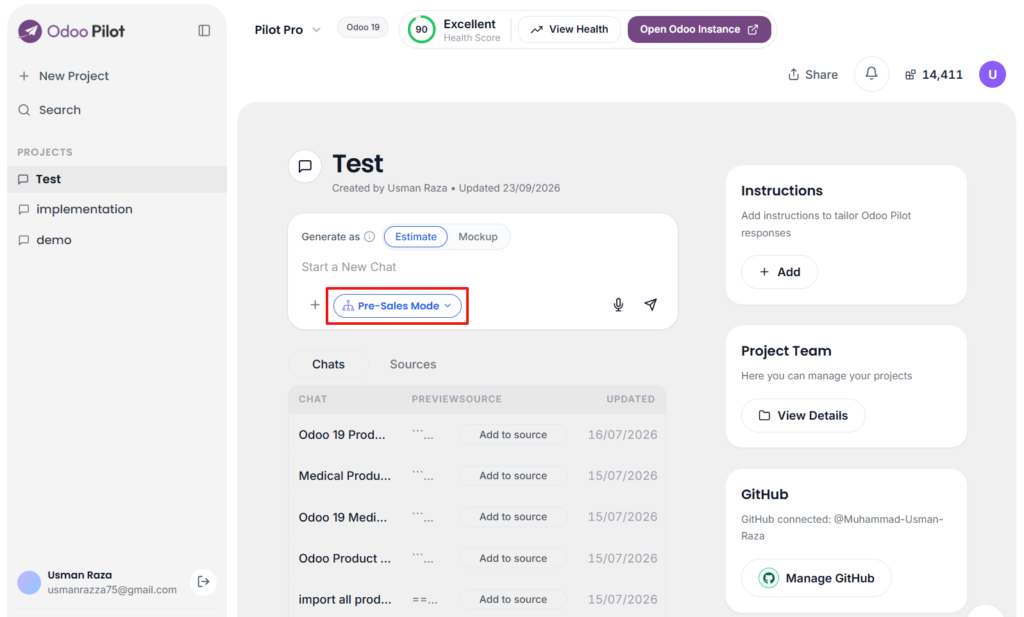
Main Options
Pre-Sales Mode includes two main workflows:
- Estimation
- Mockup
Estimation
Estimation converts a client requirement into a structured estimate. Before producing the estimate, Odoo Pilot performs an Internal Discovery Review to analyze the requirement and identify uncertainties that can affect scope, effort, and delivery.
The discovery review helps determine whether the requirement can be handled through standard Odoo configuration or requires additional customization or development.
It includes:
- Business requirement summary
- Required Odoo apps
- Gap analysis
- Scope of work
- Configuration requirements
- Custom development areas
- Integrations
- Reports and dashboards
- Assumptions
- Risks
- Estimated timeline
- Estimated effort
- Pricing guidance
- Suggested implementation phases
- Client questions
- Proposal-ready output
Internal Discovery Review
After the user submits an estimation requirement, Odoo Pilot generates an Internal Discovery Review before the client estimate is produced.
The review shows:
- Confidence level
- Readiness status
- Number of identified requirements
- Number of questions remaining
- What Odoo Pilot understood from the requirement
- Odoo Pilot recommendations
- Discovery questions that need clarification
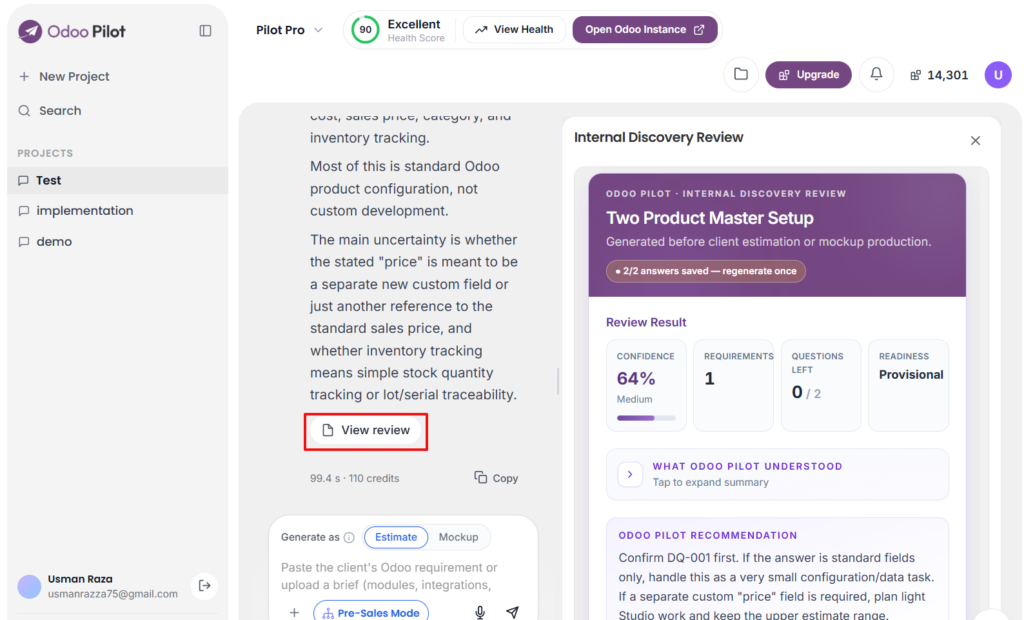
Discovery Questions
Odoo Pilot generates multiple discovery questions depending on the requirement.
Assumption
An Assumption question asks the user to confirm or correct a temporary planning assumption being used by Odoo Pilot.
Questions also indicate their impact and whether answering them is required or optional.
Answering Discovery Questions
For each discovery question, Odoo Pilot provides a suggested answer based on its understanding of the requirement.
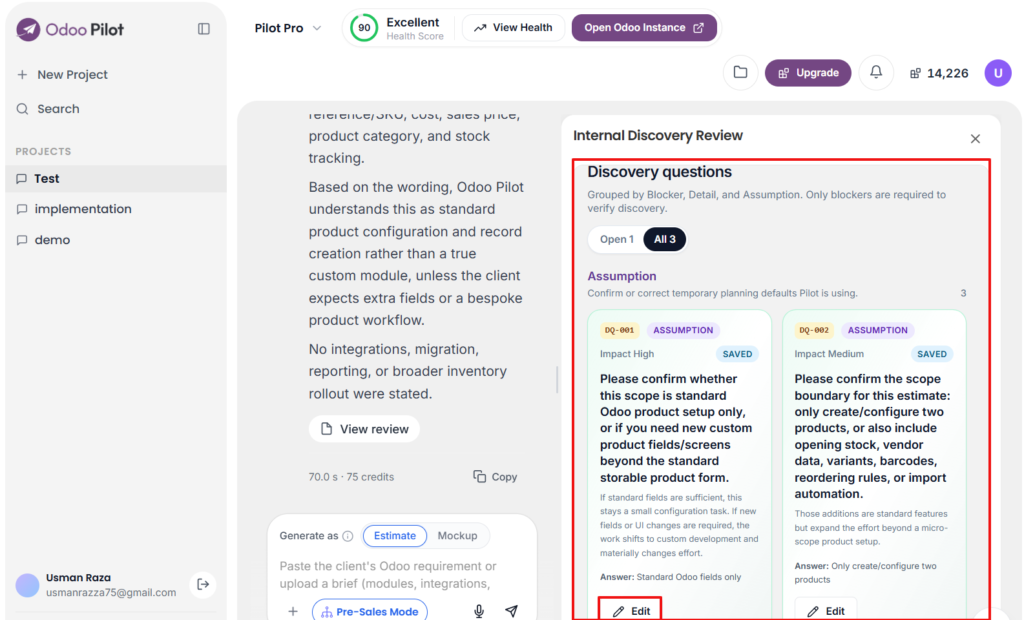
User does:
- Accept suggestion
- Write answer
- Edit own/assumption questions
- Provide their own clarification
This allows the user to confirm Odoo Pilot’s assumption or provide the actual client requirement.
Add Extra Information
Users provides additional information during the discovery review.
The review includes an optional Notes field where users add additional clarification for the team.
User also attachs supporting files where required.
Pre-Sales Report
After generating an estimate, Odoo Pilot shows a View review button depending on the estimation stage.
Internal Discovery Review
When the user clicks View review, the Internal Discovery Review panel opens.
This panel allows users to review the discovery information generated from the requirement before creating the final estimate.
User reviews and refine the discovery information before proceeding with the estimate.
The Internal Discovery Review also provides options such as:
- Download Internal PDF
- Regenerate Review
- Create Estimate Anyway
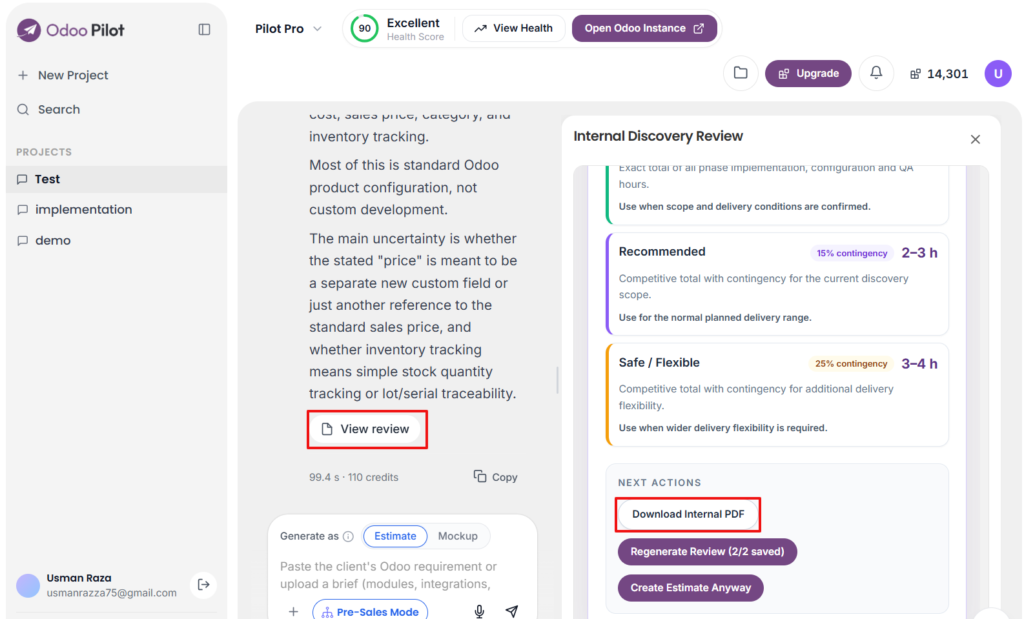
Download Report
The Pre-Sales supports download options such as:
Mockup
Mockup is used to create a visual representation of an Odoo screen or workflow before implementation starts.
User provides a client requirement and Odoo Pilot analyzes it to identify the screens that may be required for the requested functionality.
The mockup workflow allows users to review the suggested screens, select the required screens, edit their descriptions, and then generate the final visual mockups.
After the user submits a requirement in Mockup Mode, Odoo Pilot analyzes the requirement and creates a list of suggested screens.
Depending on the requirement, Odoo Pilot suggests one or multiple screens.
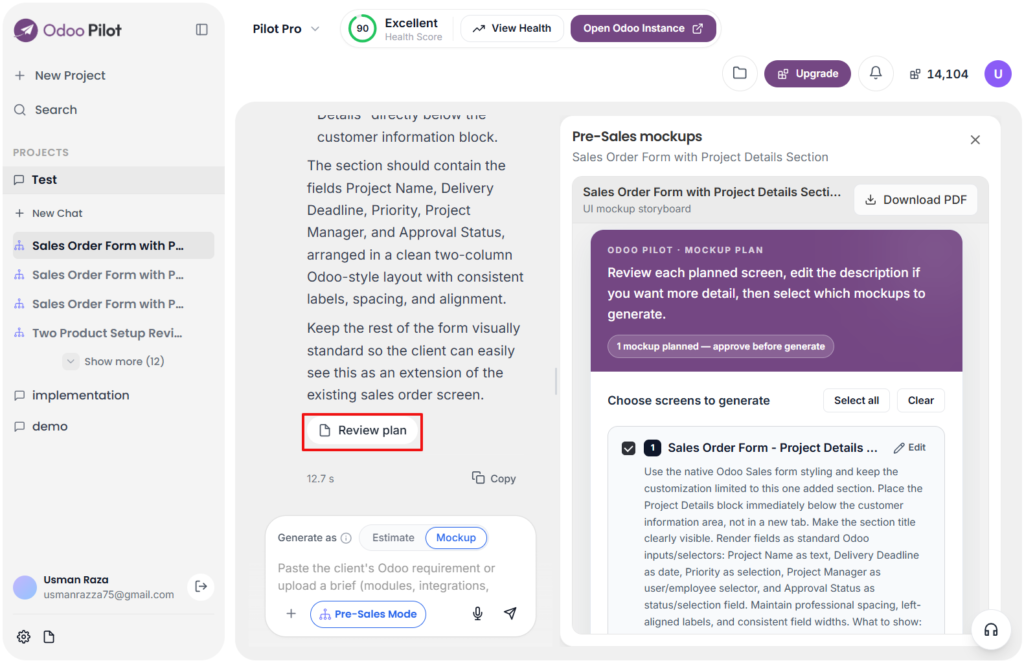
Mockup helps users create a visual preview of a client requirement.
Select and Edit Screens
The Choose screens to generate section allows users to control which suggested screens should be generated.
User does:
- Select an individual screen
- Select all suggested screens using Select all
- Clear the current selection using Clear
- Edit an individual screen using Edit
The Edit option allows users to refine the screen description or requirements before generation.
This gives users control over the screens and information that will be included in the final mockup.
Generate Mockups
After reviewing the suggested screens, user generates the required mockups.
User chooses:
- Generate selected
- Generate all
Mockup Storyboard
After generating a mockup, Odoo Pilot shows a View storyboard button.
When the user clicks View storyboard, the Pre-Sales mockups panel opens. This panel shows the generated visual concept or storyboard for the requested Odoo screen or workflow.
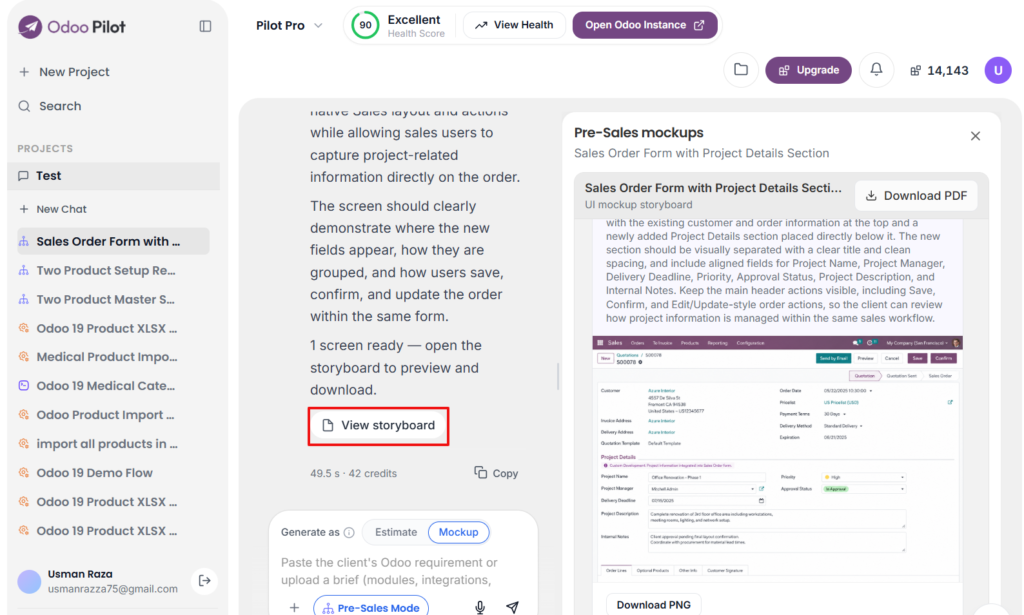
The Pre-Sales mockups panel provides a Download PDF option for downloading the storyboard.
The generated screen preview also provides a Download PNG option for downloading the individual mockup image.
User download the mockup as a PDF and share it with the client before implementation starts.
When to Use Pre-Sales Mode
Use this mode when:
- A client shares a new requirement
- You need an estimate
- You need a gap analysis
- You want to explain scope
- You need a proposal
- You need timeline and pricing guidance
- You want to show a visual concept before development
Best Practices
Use Pre-Sales Mode with a clear and complete requirement so Odoo Pilot can generate a better estimate or mockup in fewer attempts.
- Providing complete details helps Odoo Pilot avoid repeated missing requirements and unnecessary regeneration
- For better estimation, fill the optional estimation settings such as proposal type, hourly rate, client budget, timeline, and currency.
- For better mockups, explain the requirements, fields, buttons, user flow and layout expectation.
A short or unclear prompt can still work, but it can produce a general estimate or basic mockup.
Implementation Mode
Overview
Implementation Mode is used for functional Odoo setup, guided configuration, data import, task planning, and controlled execution in a connected Odoo database.
This mode is best for standard Odoo implementation work such as creating master data, setting up workflows, preparing import templates, validating files, and executing approved configuration steps.
Implementation Mode is needed to connect to the Odoo database in the project; otherwise, Odoo Pilot will not allow the use of this mode.
When to Use Implementation Mode
Use Implementation Mode when the task is related to standard Odoo setup or implementation.
Common examples include:
Setting up CRM stages, tags, leads, and opportunities
Creating customers, vendors, and contacts
Creating products, product variants, categories, and pricelists
Setting up warehouses, locations, operation types, and routes
Preparing sales, purchase, inventory, or accounting demo flows
Generating CSV or Excel import templates
What Implementation Mode Can Do
Implementation Mode can help with:
- Installing or checking standard Odoo apps where supported
- Creating implementation task plans
- Setting up master data
- Creating customers, vendors, products, warehouses, pricelists, and other records
- Generating CSV or Excel import templates
- Validating uploaded import files
- Importing approved data into Odoo
- Configuring workflows
- Avoiding duplicate records where possible
- Tracking task status
- Showing execution footprints
- Asking for missing information before continuing
- Retrying or reimplementing failed tasks
- Supporting rollback where available
- Allowing the user to mark tasks as reviewed after verification
Task Planning
When a requirement is submitted, Odoo Pilot splits it into tasks and subtasks.
Tasks include:
- Required apps
- Required configuration
- Master data creation
- Import steps
- Record creation or update
- Validation checks
- Missing information
- Failed or pending actions
- User review steps
Missing Information Handling
If required information is missing or unclear, Odoo Pilot asks for the missing details before continuing.
Missing information includes:
accounting_localization_and_tax_policy
posting_policy
online_payment_provider
delivery_pricing_policy
salary_amounts
commission_overtime_allowance_policy
- payroll_accounting_policy
In some cases, Odoo Pilot shows an Add required/missing information popup in Re-implement button before allowing the user to proceed.
Safe Execution
Before changing records, Odoo Pilot performs checks such as:
These checks include:
- Confirming the required Odoo app is available
- Confirming the required model exists
- Confirming required fields are available
- Searching for existing records to avoid duplicates
- Validating required values
- Checking dependencies between tasks
- Checking whether the connected user has permission
- Showing skipped, failed, or blocked steps
- Recording the result in execution footprints
- Allowing retry, reimplement, or continuation where possible
Task Panel and Execution Controls
Overview
This section explains common task actions in Implementation Mode, such as creating tasks, editing tasks, adding follow-up work, reviewing footprints, using rollback, and understanding how approval and execution work.
How to Create a Task
Users can create a task in Implementation Mode in two ways.
First, Odoo Pilot automatically creates tasks after the user submits an implementation requirement. These tasks are generated from the original prompt and include app checks, configuration steps, master data creation, imports, validations, and review steps. In Implementation Mode, Odoo Pilot creates a task panel on the right side of the workspace. This panel helps users track the implementation flow, review task status, open execution details and add follow-up tasks.
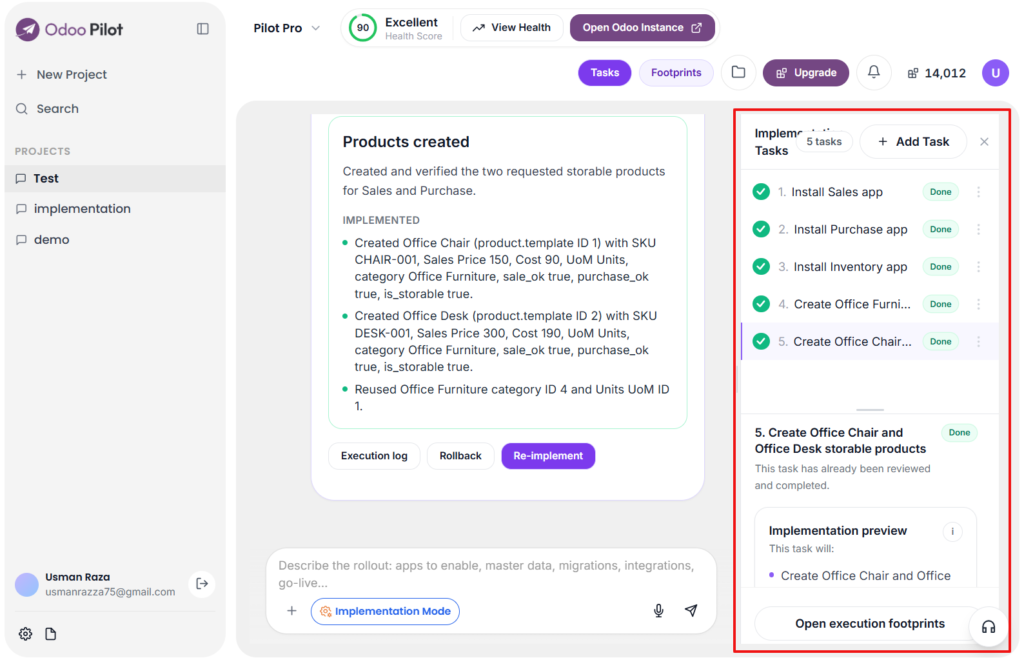
The task panel shows:
Total number of tasks
Completed tasks
Failed tasks
Pending tasks
Subtasks
Task preview
Proceed action
Add Task option
Users can click View Tasks to open the implementation task panel when it is hidden.
Second, users can manually create a task by clicking Add Task from the task panel.
This is useful when the user wants to extend the implementation flow after the original task plan was generated or add a follow-up task for missing, failed, or additional work.
When the user clicks Add Task, Odoo Pilot opens the Add implementation task popup.
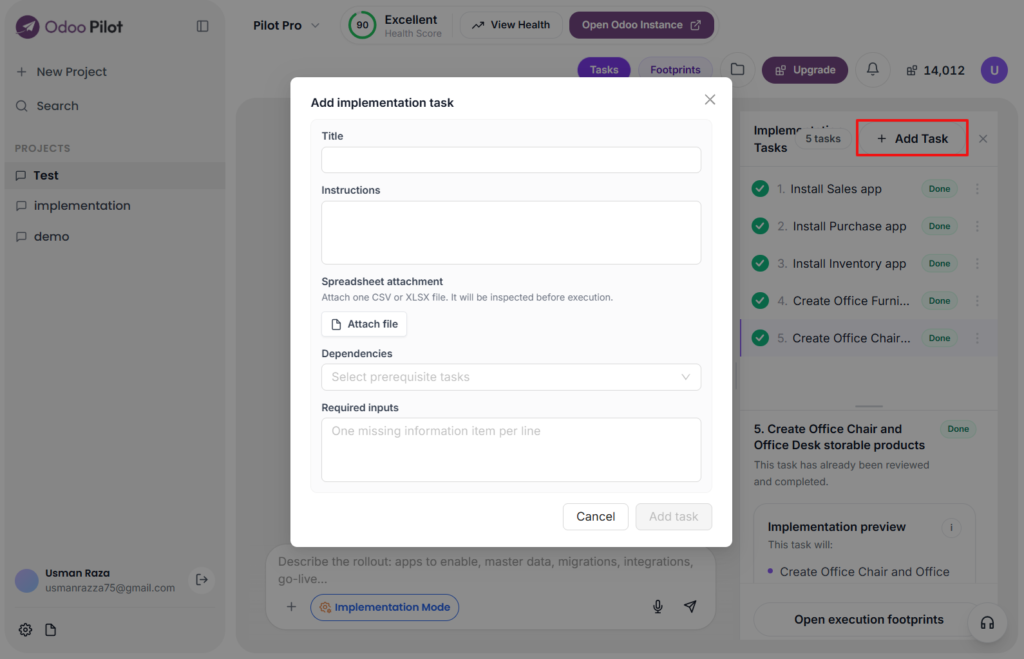
Users can add:
- Title
A short name for the task. - Instructions
The full requirement or action that Odoo Pilot should perform. - Spreadsheet attachment
Users can attach one CSV or XLSX file. - Dependencies
Users can select prerequisite tasks that should be completed before this new task runs. This is useful when the new task depends on earlier setup, such as apps installation, customer creation, product creation, or sales order confirmation. - Required inputs
Users can list missing information needed for the task. Each missing item should be added on a separate line.
For example, users may add a task to:
- Create additional records
- Fix missing configuration
- Add another import step
- Verify existing records
- Continue a failed process
- Add a follow-up implementation requirement
- Run a task only after selected prerequisite tasks are completed
The Add task button becomes available after the required task details are entered.
Added tasks should be clear and specific so Odoo Pilot can execute or guide them correctly. If the task depends on earlier work, users should select the correct dependency from the prerequisite task list.
How to Edit a Task
A task should be reviewed before execution. If a task needs correction, the user can update the instruction where the interface allows editing.
This keeps the original task history clear and creates a proper follow-up record.
How to Add Subtasks
Odoo Pilot creates subtasks automatically when a task needs follow-up work, missing information, or reimplementation.
Users can also add a new related task through Add Task and select prerequisite tasks in the Dependencies field. This helps Odoo Pilot understand which earlier task must be completed before the new task runs.
Subtasks or follow-up tasks are useful when:
- A task failed
- A step was skipped
- Extra data needs to be imported
- A previous task needs verification
- A correction is required after execution
What Execution Footprints Are
The Footprints panel shows a broader execution history for the current task or chat.
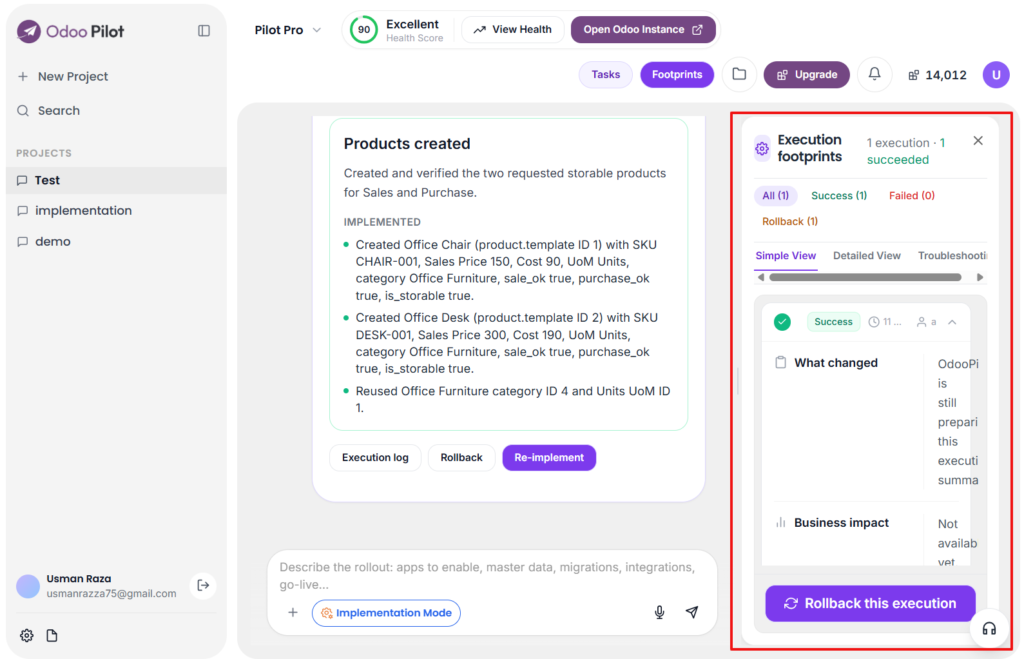
It includes tabs such as:
All
Success
Failed
Rollback
They show:
- Odoo model used
- Action type such as search, create, update, or read
- Success or failure status
- Database name
- What happened during the step
- Technical response where available
- Rollback availability where supported
Footprints help users audit the work performed by Odoo Pilot and verify whether the task actually touched the expected Odoo records.
Footprints can be opened from the Execution log button or Footprints button in the top bar or from execution-related task actions.
What Rollback Means
The Rollback button is used when Odoo Pilot can reverse a supported execution step.
Which Actions Support Rollback
Rollback is available when Odoo Pilot incorrectly creates or updates records in a way that can safely be undone.
Rollback is useful when:
Wrong records were created
A task was executed with incorrect details
The user wants to undo a recent supported change
A test execution needs to be reverted
Rollback is not always available. Some actions, such as read-only searches, verification steps, already-existing records, or complex business flows, do not support rollback.
If rollback is not available, Odoo Pilot clearly shows that the step cannot be rolled back.
How Users Can Perform a Rollback
To perform a rollback:
- Open the task result.
- Click Execution log or open Footprints.
- Check whether rollback is available for the step.
- Click Rollback button where available.
- Review the result after rollback.
- Verify the record inside Odoo.
Users should only use rollback when they are sure the executed change should be undone.
How Task Approval and Execution Work
Implementation Mode usually follows a controlled execution flow.
First, Odoo Pilot prepares the task plan. The user reviews the tasks and confirms whether the plan is correct. After that, the user can proceed with execution.
During execution, Odoo Pilot checks apps, fields, records, dependencies, and required information. If something is missing, it asks for more details before continuing.
After execution, the user should review the task summary, execution log, and footprints. The task should only be marked as reviewed after the user verifies the result inside Odoo.
What Re-Implement Means and When to Use It
The Re-implement button is used when a task needs to be run again with corrected details, missing information, or a new follow-up instruction.
It does not always mean starting from zero. It creates a follow-up subtask to complete only the missing, skipped, failed, or corrected part of the original task.
When users click Re-implement, Odoo Pilot shows a popup where they can add:
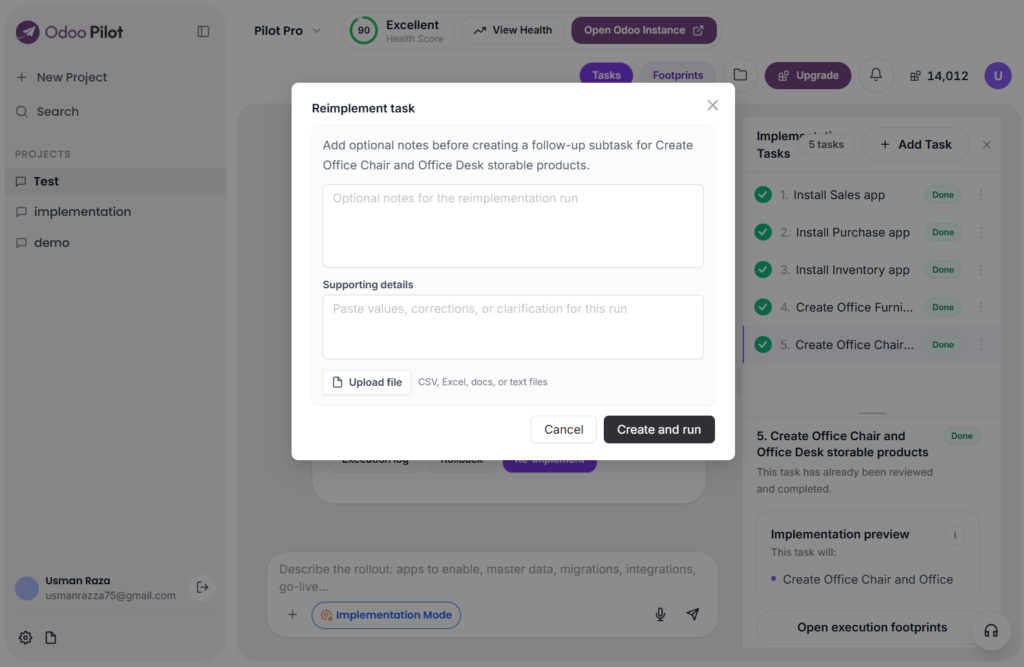
Optional notes
Supporting details
Corrections
Clarifications
Uploaded files such as CSV, Excel, documents, or screenshots
After the user clicks Create and run, Odoo Pilot creates a reimplementation subtask and attempts the task again using the updated information.
Use Re-implement when:
A task failed
Required information was missing
A task was partially completed
Odoo Pilot skipped something important
The result exists but needs correction
Before reimplementing, users should check the task result, execution log, and footprints to understand what was already created or updated in Odoo.
How Users Provide Master Data Files for Import
Users can provide master data files by uploading a CSV file in Implementation Mode.
Users can upload files in two common ways:
From the chat input
Use this when the file is related to the current prompt or task.From Add Task or Re-implement popup
Use this when the file belongs to a specific implementation task, follow-up task, or import correction.
Before importing, Odoo Pilot inspects the file, check the headers, validate required fields, detect missing values, and confirm whether the file is ready for Odoo import.
If the file has issues, Odoo Pilot explains what needs to be fixed before execution.
Users should make sure the file has clean column names, correct data format, no duplicate rows, and Odoo-compatible values before asking Odoo Pilot to import it.
Data Import Workflow
A typical import flow:
- User uploads the file in the same task.
- Odoo Pilot validates the file.
- Odoo Pilot imports the data if validation passes.
- User verifies the records inside Odoo.
- User marks the task as reviewed only after verification.
This workflow is useful for importing products, contacts, vendors, customers, pricelists, inventory data, and other master data.
Marking Tasks as Reviewed
A task should be marked as reviewed only after the user verifies the result inside Odoo.
Before marking a task as reviewed, check:
The expected records exist in Odoo
The correct values were created or updated
No duplicate records were created
The workflow works as expected
Failed steps are either fixed or accepted
Footprints match the actual result
If the task says completed but the record is not visible in Odoo, do not mark it as reviewed until the issue is checked.
Best Practices
Use Implementation Mode with a clear and complete requirement so Odoo Pilot can prepare better tasks, avoid unnecessary follow-up questions, and reduce repeated execution.
- Providing complete details helps Odoo Pilot understand the requirement in the first attempt. This can reduce credit usage because fewer follow-up prompts, retries, reimplementations, and corrections are needed.
- A short or unclear prompt can still work, but it creates general tasks, ask for missing information, or require multiple follow-up runs.
- A complete prompt saves time, improves accuracy, and helps avoid wasted credits.
This helps avoid duplicate records, incomplete implementation, and unnecessary repeated execution.
Pilot Studio
Overview
Pilot Studio is used for controlled Odoo-side customization inside a connected database. It is different from Implementation Mode because it focuses on technical changes such as fields, views, menus, actions, and automation.
Pilot Studio is needed to connect to the Odoo database in the project; otherwise, Odoo Pilot will not allow the use of this mode.
Use this mode carefully, preferably first on a demo or staging database.
What Pilot Studio Can Customize
Pilot Studio supports:
- Creating custom fields
- Creating custom workflow
- Adding fields to forms, lists, kanban views, or search views
- Updating labels and placeholders
- Adding tabs, groups, and sections
- Creating menus and window actions
- Creating filters and search options
- Creating automated actions
- Creating server actions
- Creating scheduled actions
- Updating email templates
- Adding workflow automation
- Adjusting safe technical settings
Safety Rules
Pilot Studio uses a controlled approval process for Odoo-side changes.
Before a task is executed:
- Odoo Pilot creates an execution plan based on the requirement.
- The requirement is divided into individual implementation tasks where required.
- The tasks appear in the Pilot Studio Tasks panel.
- Tasks remain pending until the user approves them.
No database changes are made simply by generating the plan and tasks.
Users should review each task and click Proceed only when they are ready to approve that specific Odoo-side change.
If the target is unclear, Odoo Pilot asks for clarification instead of guessing.
Task-Based Execution and Approval
Pilot Studio uses a task-based execution flow for complex Odoo customizations.
After the user submits a customization requirement, Odoo Pilot analyzes the requirement and breaks the work into multiple implementation tasks where needed.
Each task represents a specific part of the requested customization and can be executed separately.
Approve and Execute Individual Tasks
Each Pilot Studio task requires user approval before it is executed in the connected Odoo database.
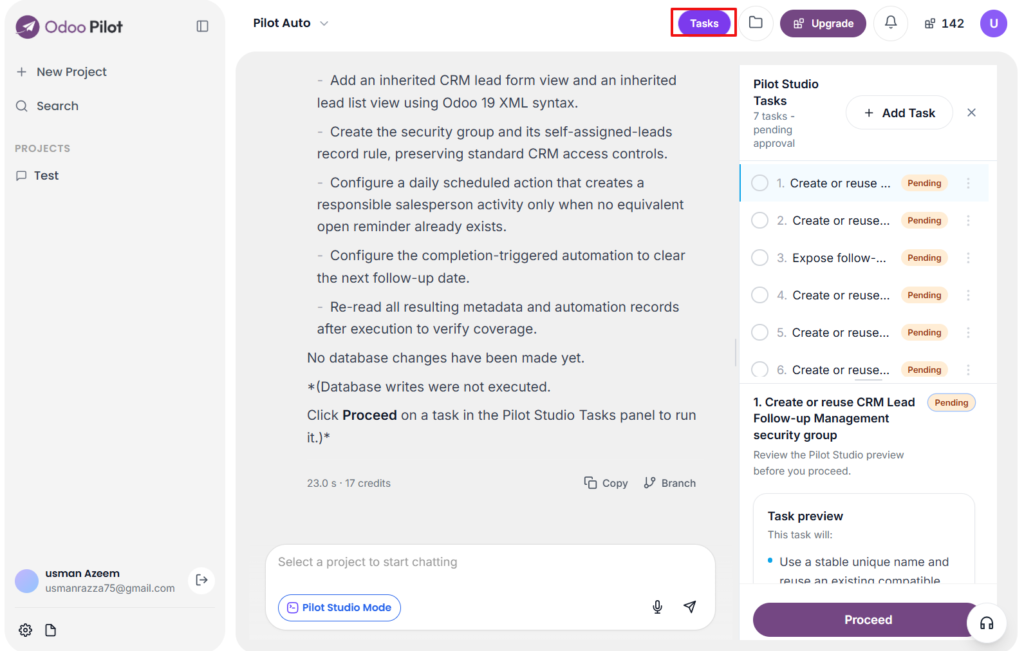
The task workflow is:
- Odoo Pilot creates the implementation tasks from the requirement.
- The user selects the task to work on.
- The user reviews the task details and execution information.
- The user clicks Proceed to approve that specific task.
- Odoo Pilot performs the approved task in the connected Odoo database.
- The user returns to Odoo Pilot and clicks Mark Review after verifying the task.
- Odoo Pilot moves the workflow to the next task.
- The same process is repeated until all required tasks are completed.
This task-by-task approval flow gives users more control over technical changes and allows each implementation step to be reviewed before continuing.
What Footprint shows
The Execution Footprints section shows the technical record of executions performed by Pilot Studio.
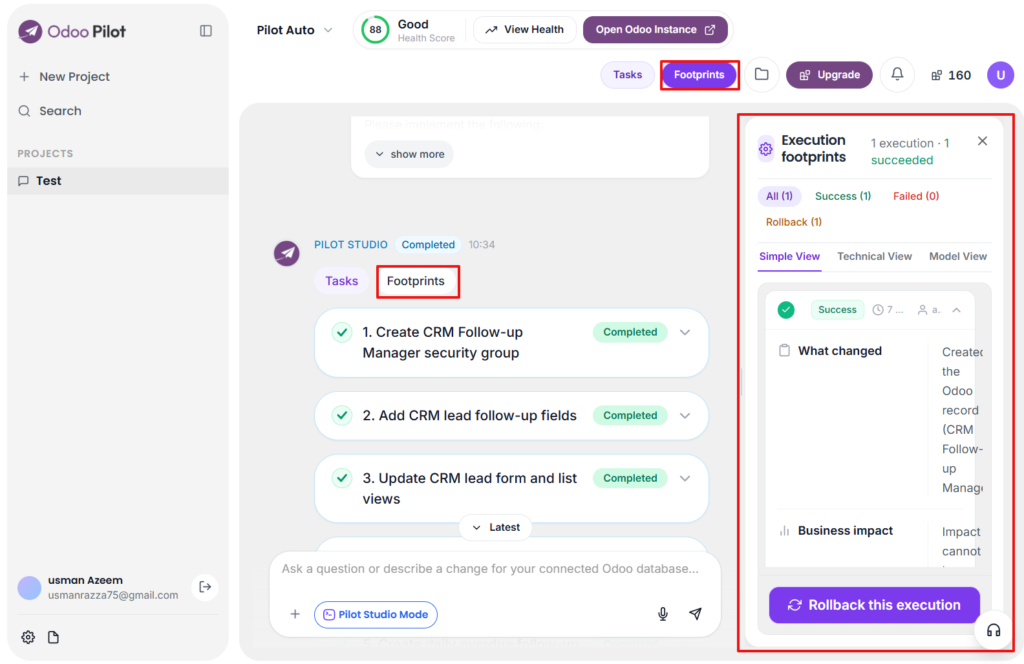
It helps users review what happened during the Odoo-side execution.
A footprint show:
- Execution count
- Successful executions
- Failed executions
- Rollback availability
- Odoo operations performed
- Target models
- Created or updated records
- Fields affected
- Technical operation details
- Error information where available
The footprint also provide different views for reviewing the execution, such as Simple View, Technical View, and Model View.
The Model View can show model-wise changes, including operations such as Create, Update, or other supported actions and the related record or field.
Users open the execution footprint after completing a task to verify what Pilot Studio actually performed in Odoo.
What Rollback in Pilot Studio
Rollback means undoing a supported execution step.
In Pilot Studio, rollback is available for some created or updated records where Odoo Pilot safely reverse the change.
How Pilot Studio Execution Works
Pilot Studio execution follows a task-by-task workflow:
- User submits a customization requirement.
- Odoo Pilot analyzes the requirement and creates multiple implementation tasks where required.
- User reviews the first task.
- User clicks Proceed to approve the task.
- Odoo Pilot executes that task in the connected Odoo database.
- User reviews the execution result and verifies the change in Odoo.
- User returns to Odoo Pilot and clicks Mark Review.
- The workflow moves to the next task.
- User repeats the same process for each remaining task.
- Execution Footprints can be reviewed to inspect the technical changes.
- After all tasks are completed, the complete customization can be verified inside Odoo.
This workflow provides step-by-step approval and verification instead of executing the entire requirement as one direct Odoo-side operation.
How can users verify Pilot Studio changes
Users should verify results directly inside Odoo from the related app, form view, list view, search filter, menu, or technical settings area.
For multi-task customizations, users should verify each important change before clicking Mark Review and moving to the next task.
Best Practices
Use Pilot Studio with a clear and complete customization requirement so Odoo Pilot create the appropriate implementation tasks and identify the correct Odoo models and technical records.
A good Pilot Studio prompt should include:
- Target Odoo app
- Target model, such as Sales Order, CRM Lead, Product, or Contact
- Field name
- Field type, such as text, selection, date, boolean, monetary, or many2one
- Field values if it is a selection field
- Exact form/list/search view location
- Whether the field should appear in form view, list view, kanban view, or search view
- Any required button, menu, filter, or automation
- Trigger and condition if automation is needed
- Expected result after execution
- Whether Odoo Pilot should create a new customization or update an existing one
- Duplicate prevention rule
Providing complete details helps Odoo Pilot avoid guessing the wrong model, creating duplicate fields, placing fields in the wrong view, or asking repeated follow-up questions. This can reduce credit utilization on complete and accurate requirements at once.
A short prompt can work for simple changes, but for technical customization, a detailed prompt is better for accuracy, safety, and saving credits.
Module Builder Mode
Overview
Module Builder Mode is used to create, improve, or debug Odoo modules, apps, connectors, and technical customizations. Use this mode when the output should be proper Odoo code instead of direct database changes.
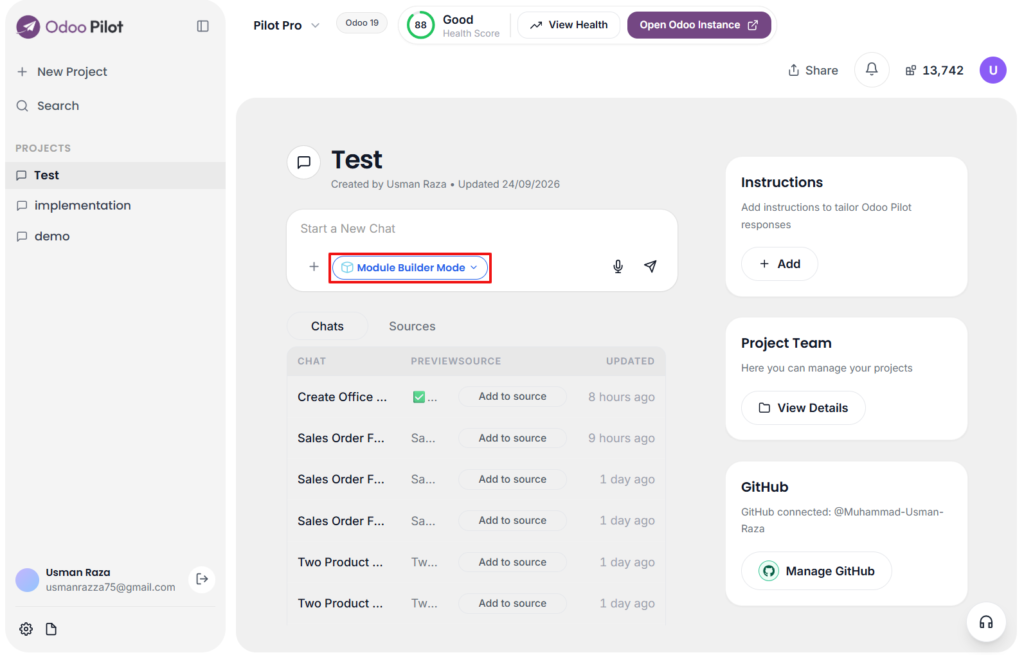
What Module Builder Can Do
Module Builder can help with:
- Creating a full Odoo module from scratch
- Building custom Odoo apps
- Creating API connectors
- Debugging uploaded ZIP modules
- Fixing installation errors
- Fixing XML, security, manifest, controller, or dependency issues
- Generating models, fields, views, menus, and actions
- Creating wizards and transient models
- Creating controllers and portal pages
- Creating QWeb/PDF reports
- Creating scheduled actions
- Creating dashboards and backend menus
- Preparing downloadable ZIP files
- Preparing GitHub-ready code
Working from a New Requirement
A generated module includes files such as:
- __manifest__.py
- __init__.py
- Python models
- XML views
- Menu items
- Security access files
- Record rules
- Wizards
- Controllers
- Reports
- Data files
- Demo data
- Static assets
- Scheduled actions
- Configuration settings
- README or app description
Working from Existing Code
When a user uploads an existing module ZIP, Odoo Pilot can:
- Read module structure
- Check manifest dependencies
- Review models, views, security, controllers, and assets
- Find missing files or incorrect imports
- Detect XML ID errors
- Detect access rights issues
- Suggest fixes
- Apply improvements
- Generate an updated ZIP
How users preview generated module code
After Module Builder generates or updates module code, Odoo Pilot shows an Open Preview button.
When the user clicks Open Preview, the Code Preview panel opens. This panel shows the generated module files in a project tree and code editor.

Users can open each file to review the generated code before downloading or pushing it to GitHub.
The Code Preview helps users review the module structure, files, dependencies, and generated code before download or GitHub push.
Download and Code Options
Users can open the Code Preview options and select Download ZIP. This downloads the complete module package.

Inside the Code Preview, users can use additional options such as:
- Download ZIP
- Download current file
- Git history
GitHub Sync in Module Builder
Module Builder can work with a linked GitHub repository when GitHub is connected.
The GitHub sync option allows users to pull the latest code from GitHub or push generated/editor changes back to the repository.

The GitHub sync popup shows:
- Connected repository name
- Active branch
- Last pull/sync time
- Change repository option
- Pull changes
- Push changes
- New repository option
- Create branch option
Best Practices
Use Module Builder Mode with a complete technical requirement so Odoo Pilot can generate better module structure, reduce missing files, and avoid repeated regeneration. This can reduce credit utilization on complete and accurate requirements at once.
A short prompt can work for simple modules, but for real Odoo development, a detailed technical prompt is better for accuracy, safety, and saving credits.
Website Builder Mode
Overview
Website Builder Mode is used to create Odoo website pages, landing pages, reusable snippets, frontend sections, and website module assets.
It can work from prompts, screenshots, Figma designs, local website files, or design references. 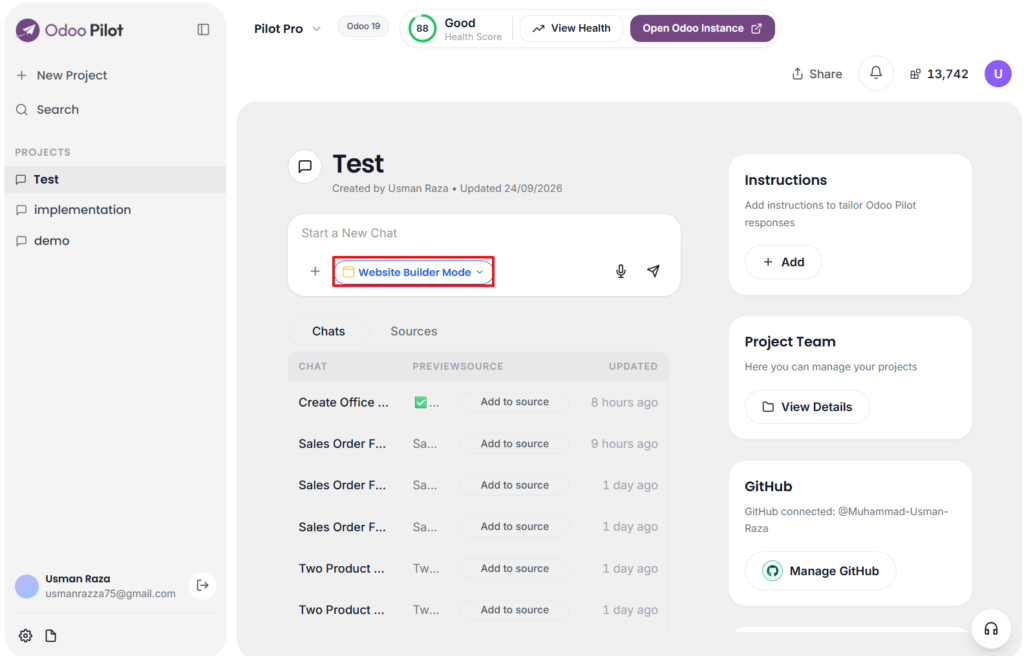
What Output Can Be Created
Website Builder generates:
- Complete website pages
- Reusable Odoo snippets
- Website XML templates
- CSS/SCSS files
- JavaScript assets
- Website module ZIP files
Working from a Prompt
A good website prompt should include:
- Page name
- Business type
- Target audience
- Required sections
- Brand colors
- Content style
- CTA buttons
- Images or design references
- Layout preference
- Odoo version
- Whether output should be preview-only or module-ready
Expected User Action
If more Figma usage is required, the user can upgrade to a higher plan such as the Pro plan.
How to Connect Figma
To use Figma URL integration with Website Builder:
- Open Account Settings.
- Go to Connectors.
- Find Figma.
- Click Connect.
- Complete the Figma connection process.
- Return to Website Builder Mode.
- Use Add from Figma and provide the required Figma design URL.
Figma Integration in Website Builder
Website Builder uses Figma designs to generate Odoo-compatible website pages, sections, snippets, and module assets.
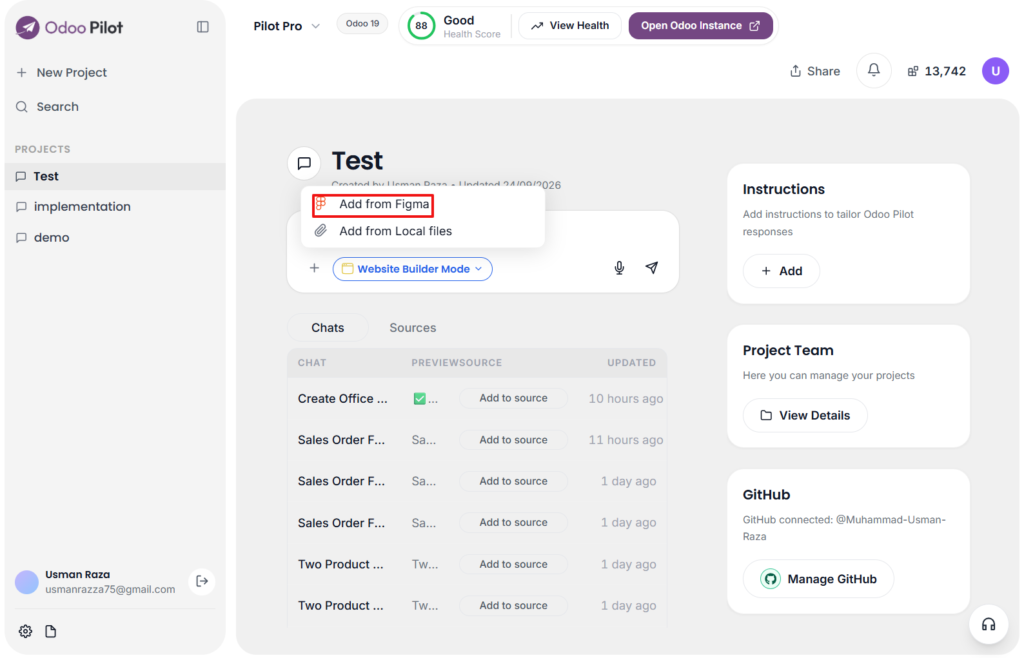
Using Figma in Website Builder
To generate a website from Figma:
- Open Website Builder Mode.
- Click the attachment/add option.
- Select Add from Figma.
- Paste the Figma design or frame URL.
- Click Load or Sync latest.
- Select the correct frame if multiple frames are available.
- Ask Odoo Pilot to generate the Odoo website output.
- Review the generated preview and files.
The generated output includes website pages, snippets, XML templates, CSS/SCSS, JavaScript files, images, and module files.
User can attach a Figma design from the Website Builder attachment option.
The Add From Figma interface provides two input methods:
- Figma URL
- Upload files
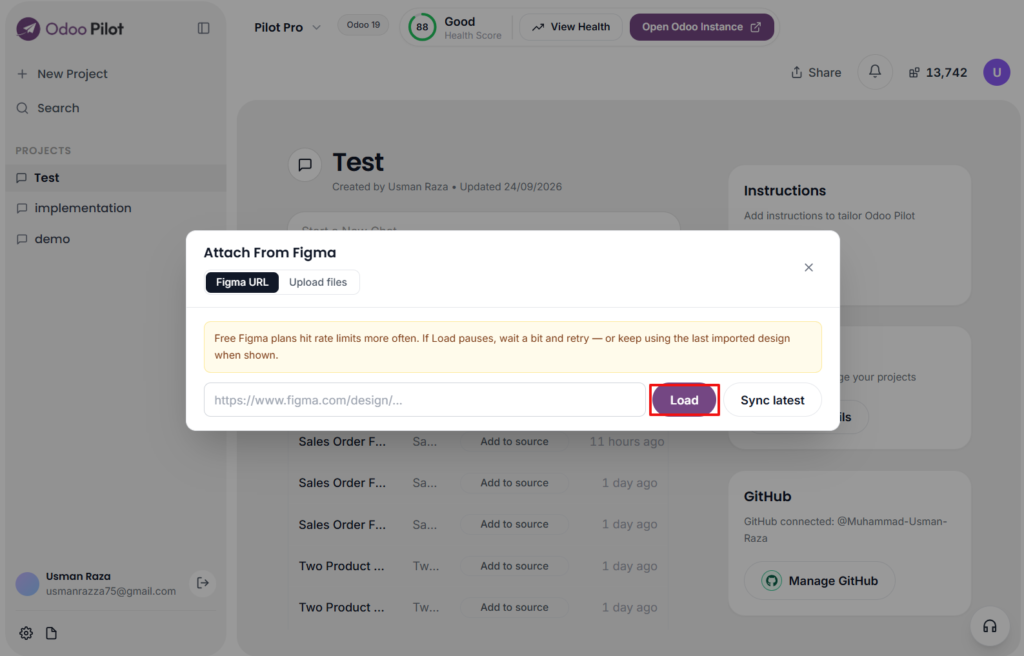
Figma Load and Sync Options
The Figma popup includes:
- Load
Loads the provided Figma URL or available saved Figma structure. - Sync latest
Attempts to fetch the latest Figma design data.
If the latest sync is unavailable, Odoo Pilot continues using the most recently imported Figma structure.
Uploading Design Files
The Upload files option use when the Figma URL cannot be used or when additional design files and assets need to be provided.
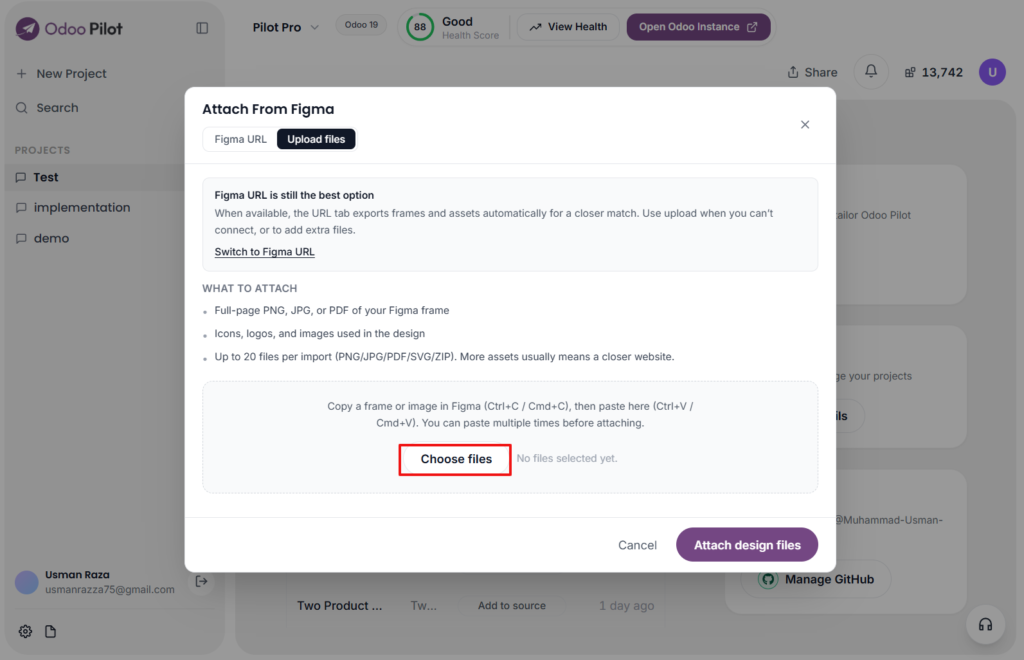
Figma Limitations
Figma usage is limited based on the user’s plan or Figma API limits.
Users can face issues such as:
- Figma rate limit reached
- Figma URL not loading
- Wrong frame selected
- Figma file permission issue
- Make sure the connected Figma account has view access
- Design not fully converted into Odoo layout
- Missing assets or images
- Large Figma files taking longer to process
Free or limited plans can hit Figma usage limits faster. If more Figma usage is required, users can upgrade to a higher plan.
If Figma rate limit reached appears, users should wait and retry later, use the last loaded design structure if available, or upgrade the plan if more Figma usage is needed.
Local Files and Design References
Users can use Add from Local files or the Upload files option inside Attach From Figma to provide local screenshots, images, documents, ZIP files, or other design references for Website Builder.
These options are useful when:
- The Figma file is not available
- The user has screenshots only
- The user cannot connect to Figma
- The design is saved as image or document files
- The user wants Odoo Pilot to follow an existing page layout
- The task needs additional branding or content references
- A screenshot or exported Figma frame needs to be provided
- Additional icons, logos, or images are required
- Design assets are stored locally
- A ZIP file contains relevant design assets
Uploaded files should be clear and related to the current website task.
Website Code Preview
After Website Builder generates website files, Odoo Pilot shows an Open Preview button.
When users click Open Preview, the Code Preview panel opens with a project tree and code editor.

The preview includes:
- Controllers
- Models
- Security files
- Website page XML
- Snippet templates
- Static files
- CSS/SCSS
- JavaScript assets
- Images
- Module manifest files
User can review the generated website files before downloading, installing, or pushing them to GitHub.
Download and Code Options
Inside Code Preview, users can use options such as:
- Download ZIP
- Download current file
- Git history
GitHub Sync in Website Builder
Website Builder can work with GitHub when a repository is linked.

The GitHub sync option allow users to:
- Pull latest code from the linked repository
- Push generated website files to GitHub
- Change repository
- Create a new repository
- Create a new branch
Users should pull the latest code before editing or regenerating website files. After reviewing the generated code, users can push the updated files to GitHub.
For larger website changes, creating a separate branch is recommended.
Where to Verify Results
- Website Pages: Website → Site → Pages
- Website Editor: Open Website → Edit
- Snippets: Website editor snippet panel
- Menus: Website → Site → Menu Editor
- Products: Website/eCommerce product pages where for eCommerce-related outputs
- Installed module: Apps menu if exported as a module
Best Practices
Use Website Builder Mode with a complete website requirement so Odoo Pilot can generate better pages, snippets, and module files in fewer attempts.
For better results:
- Clearly describe the required page and sections.
- Mention the Odoo version.
- Provide the expected layout and user flow.
- Include relevant images and design references.
- Use the Figma URL when a connected Figma design is available.
- Use Upload files when the Figma URL cannot be used or additional design assets are required.
- Make sure the Figma account has the required access.
- Select the correct Figma frame.
- Upload only relevant design files and assets.
- Avoid repeated Figma sync attempts when a rate limit is reached.
- Review the generated preview and code before downloading or pushing it to GitHub.
- Pull the latest GitHub code before making new changes.
- Test generated website modules on staging before production.
A short prompt works for simple pages, but for professional website work, a clear prompt with design references gives better results and helps save credits.
Odoo Ask Mode
Overview
It is used for Odoo-specific questions, guidance, explanations, troubleshooting, and best-practice suggestions. This mode is focused only on Odoo-related topics.
It is useful when the user wants to understand how something works in Odoo, where to find a feature, how to solve an Odoo issue, or what approach should be used for a functional or technical requirement.
Odoo Ask Mode does not perform execution, module generation, website generation, or database customization. It is designed for guidance, explanation, and Odoo-specific support.
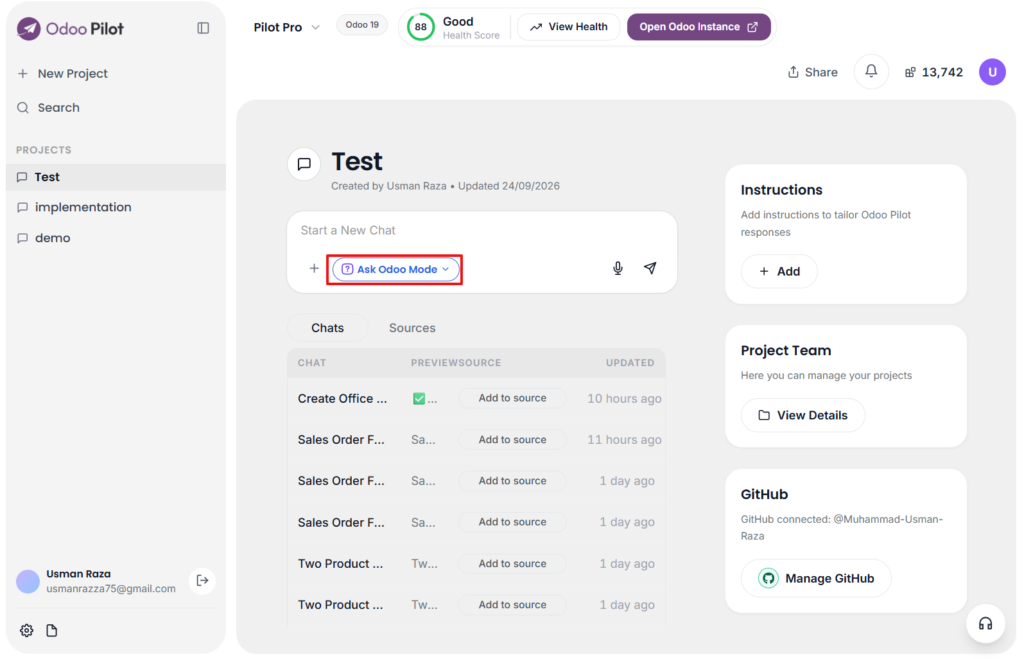
What Odoo Ask Mode Can Help With
Odoo Ask Mode can help users with:
Odoo functional questions
Odoo technical questions
Odoo menu navigation
Odoo configuration guidance
Odoo troubleshooting
Odoo error explanation
Odoo best-practice suggestions
Odoo implementation approach
Odoo module behavior explanation
Odoo field, model, and workflow understanding
Odoo version-related guidance
Odoo code examples where needed
Odoo XML, Python, model, and view guidance
- Questions about relevant data in a connected Odoo database
When to Use Odoo Ask Mode
Use Odoo Ask Mode when:
You need an explanation about Odoo.
You want to understand an Odoo feature.
You need help finding the correct Odoo menu.
You want to troubleshoot an Odoo error.
You need functional or technical guidance before execution.
You want Odoo-specific answers without creating tasks or changing the database.
Output Behavior
Odoo Ask Mode provides:
Short answer
Step-by-step guidance
Odoo menu paths
Functional explanation
Technical explanation
Configuration steps
Troubleshooting checklist
Best-practice notes
Example workflows
Python code examples
XML view examples
Model and field guidance
Warnings before making changes
Suggestions for which Odoo Pilot mode to use next
Odoo Knowledge Guidance
Odoo Ask Mode searches Odoo-related knowledge and provide guidance based on the user’s question.
It can help users understand functional flows, technical behavior, configuration steps, error reasons, and possible fixes.
When answering technical questions, Odoo Ask Mode provides:
- Explanation of the issue
- Correct Odoo approach
- Menu paths
- XML examples
- Python examples
- Manifest loading order guidance
- Quick checklist
- What to check next
- Which file or configuration needs correction
Without Database Connection
When no Odoo database is connected to the project, Odoo Ask Mode provides Odoo-specific knowledge, guidance, explanations, troubleshooting, menu navigation, configuration guidance, and best-practice suggestions.
User can ask about Odoo features, functional workflows, technical concepts, configuration approaches, XML/Python examples, and common Odoo issues without requiring access to a live Odoo database.
With Database Connection
When an Odoo database is connected to the project, Odoo Ask Mode also answer questions using relevant information from the connected Odoo database.
User can ask about actual records and data available in the connected Odoo instance, such as products, categories, customers, or other relevant Odoo records.
User can ask Odoo Pilot to provide product records with their available fields. Odoo Pilot can retrieve the relevant data from the connected database, prepare the Excel file, and provide a Download Excel option.
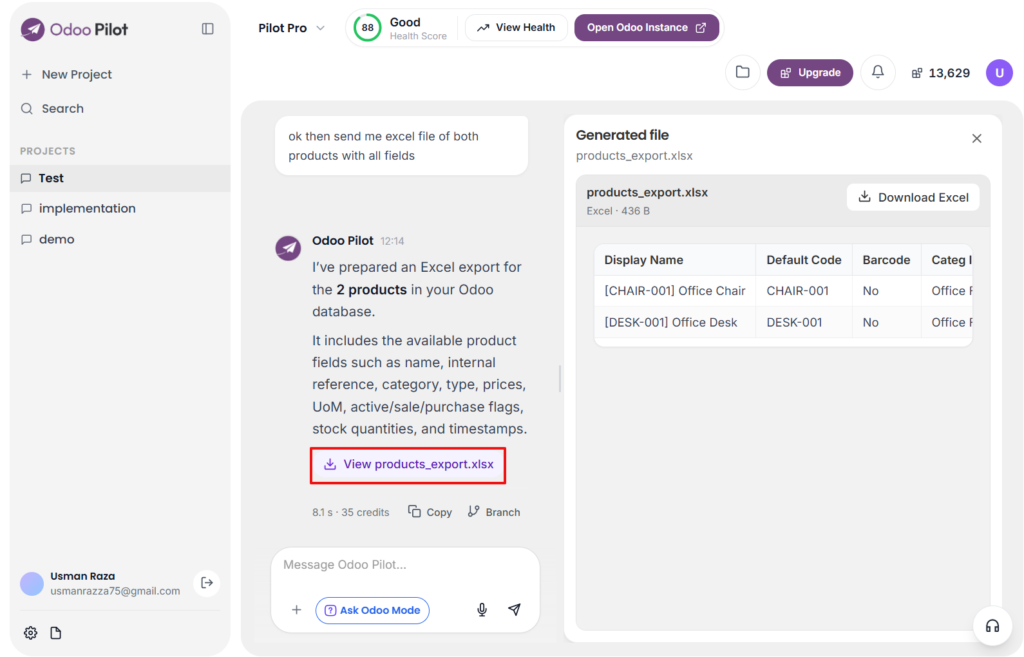
Limitations
Odoo Ask Mode should stay focused on Odoo.
It should not be used for:
General non-Odoo questions
Creating full custom modules
Executing database changes
Generating website pages
Importing master data
Applying direct customization
Running implementation tasks
If the user request requires action, Odoo Ask Mode guides the user to the correct mode, such as Implementation Mode, Pilot Studio, Module Builder, or Website Builder.
Best Practices
Use Odoo Ask Mode when you want to understand an Odoo topic before execution.
A good Odoo Ask prompt should include:
- Odoo version
- App or module name
- Functional or technical question
- Current issue or error message
- Screenshot or file if available
- Expected result
- What the user already tried
Providing complete details helps Odoo Ask Mode give a more accurate answer in fewer attempts. This can reduce credit utilization on complete and accurate requirements at once.
Account Settings
Account Settings allow users to manage their profile details, team members, password, two-factor authentication, usage, conectors, figma and account deletion options.
Users can open Account Settings from the settings icon in the left sidebar.
Account
The Account section is used to manage basic user profile information and general interface preferences.

Users can view or update:
- Name
- Email address
- Company name
- Occupation
- More about you
The More about you field can be used to add background, preferences, location, or other useful context that helps Odoo Pilot understand the user better.
General Settings
The Account section also includes theme preferences.
Available theme options includes:
- Light Mode
- Dark Mode
- System Preferences
After making changes, users should click Save. To discard changes, users can click Cancel.
Team
Overview
The Team section allows workspace owners and authorized users to manage collaborators across Odoo Pilot projects.
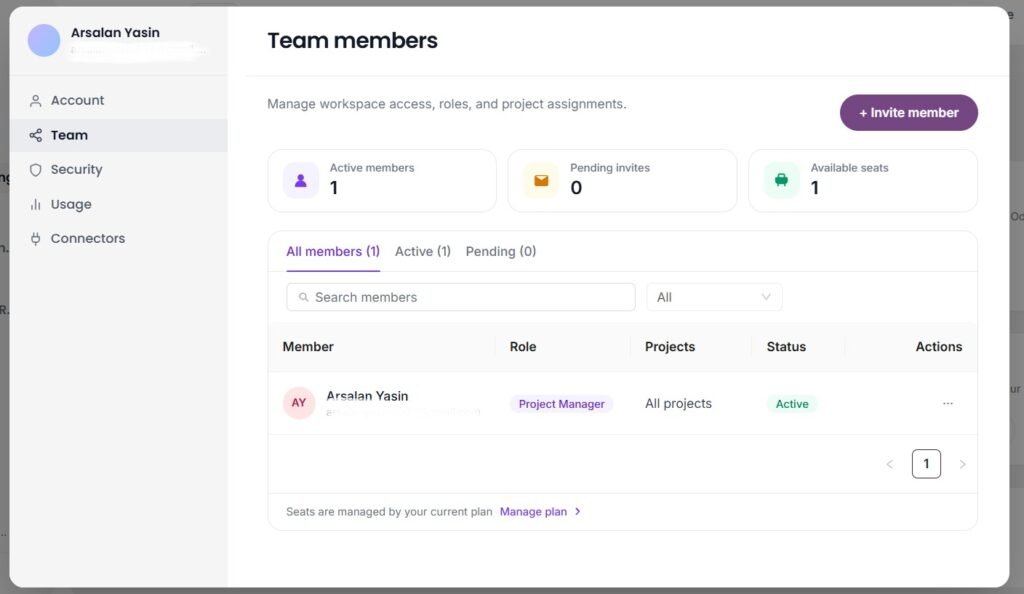
It is used to control:
- workspace access
- member roles
- project assignments
- pending invitations
- available seats under the current plan
This section is useful when teams want to collaborate with consultants, developers, project managers, business analysts, or functional experts inside Odoo Pilot.
What Users Can Do in Team
Users can:
- view all team members
- view active members
- view pending invites
- invite a new member
- assign a member to a specific project
- assign the appropriate role
- search members
- filter members by role
- resend a pending invite
- revoke a pending invite
- review available seats for the current plan
Team Overview Cards
At the top of the Team page, Odoo Pilot shows summary cards such as:
- Active members
- Pending invites
- Available seats
These cards help users quickly understand current team usage and invitation status.
Team Member Tabs
The Team page includes tabs such as:
- All members
- Active
- Pending
These tabs help users switch between the full member list, active users only, and pending invitations only.
Team Member List
The Team member table shows details such as:
- Member
- Role
- Projects
- Status
- Actions
Search and Filter
The Team page provides:
- a Search members field
- a Role filter dropdown
These options help users quickly find a member or view only a specific role group.
Invite Team Member
To invite a team member:
- Open Account Settings
- Go to Team
- Click Invite member
- Select the project
- Enter the team member’s email address
- Select the correct role
- Click Send invite
Available Roles
Odoo Pilot allows users to invite team members with different roles. Each role helps define the type of work and access a user has inside the workspace or project.
Available roles include:
- Owner
- Admin
- Project Manager
- Business Analyst
- Functional Expert
- Developer
Owner
The Owner is the main workspace or project owner.
The Owner has the highest level of access across the workspace and owned projects. The Owner can access all Odoo Pilot modes, including Pre-Sales, Implementation, Pilot Studio, Module Builder, Website Builder, and Ask Odoo.
The Owner can manage projects, invite team members, assign roles, manage project access, review team members, control billing/seats, update settings, connect Odoo databases, manage GitHub/Figma connections, and control overall workspace activity.
Use this role for the main account holder or the person responsible for workspace ownership, project control, billing, team access, and final decision-making.
Admin
The Admin role is used for users who need broad access inside the assigned project.
Admins can access all available Odoo Pilot modes for that project, including Pre-Sales, Implementation, Pilot Studio, Module Builder, Website Builder, and Ask Odoo, based on the project setup and Odoo connection.
Admins can support project setup, team coordination, configuration review, execution review, and operational control inside the project where the Owner invited them.
Use this role for senior team members who need broad access but are not the main owner.
Project Manager
The Project Manager role is used for users who manage project delivery inside the assigned project.
Project Managers can access the project where the Owner invited them and work across the main project modes available to this role, including Pre-Sales, Implementation, Module Builder, Website Builder, Pilot Studio, and Ask Odoo.
Project Managers review tasks, track implementation progress, coordinate requirements, manage timelines, check project outputs, and communicate with clients or internal teams.
Use this role for users responsible for project planning, execution tracking, delivery coordination, and reviewing work across functional and technical project areas.
Business Analyst
The Business Analyst role is used for users who gather, review, and structure business requirements inside the assigned project.
Business Analysts can access requirement-focused modes such as Pre-Sales, Implementation, and Ask Odoo.
Business Analysts work on discovery, requirement analysis, gap analysis, user flows, process documentation, estimation, mockups, internal review, and implementation planning.
Use this role for users who translate business needs into clear Odoo requirements, prepare client-facing analysis, and support the project team before or during implementation.
Functional Expert
The Functional Expert role is used for users who understand Odoo functional workflows and standard Odoo configuration.
Functional Experts can access the assigned project where the Owner invited them and work with functional setup and guidance modes, including Implementation, Pilot Studio, and Ask Odoo.
They guide configuration decisions, validate workflows, review functional setup, and confirm whether the Odoo process matches the business requirement.
Use this role for Odoo consultants or functional users who verify standard Odoo behavior, support implementation tasks, and help validate functional customization requirements.
Developer
The Developer role is used for technical users.
Developers can access technical and code-related areas of the assigned project, such as Module Builder, Website Builder, and Ask Odoo.
Developers work on custom modules, technical fixes, XML/Python code, integrations, GitHub workflows, website code, controllers, reports, automation, and module debugging.
Use this role for users responsible for technical implementation, customization, code generation, and code review.
Pending Invites
Invited users appear under Pending until they accept the invitation.
For pending invites, users can:
- Resend the invite
- Revoke the invite
This is helpful when:
- the invited user did not receive the email
- the wrong member was invited
- the project assignment needs to be changed
When to Use the Team Page
Use the Team page when:
- you want to invite a new collaborator
- you need to assign a member to a project
- you want to review who has access to which project
- you need to check pending invitations
- you want to manage roles
- you need to confirm whether seats are still available
Best Practices
- Assign the correct role when inviting a member.
- Invite members only to the projects they need.
- Review pending invites regularly.
- Revoke unused or incorrect invitations.
- Use the search and role filter when the team list becomes large.
- Check available seats before sending multiple invites.
- Review project assignments so members only access relevant workspaces or projects.
Usage
The Usage section helps users review their current plan, available credits, workspace limits, team member usage, billing cycle, renewal date, and credit consumption history.
Users can use this section to understand how many credits are available and how credits are being used across Odoo Pilot chats and tasks.
Usage Overview
The Usage section shows:
- Current plan
- Included credits
- Remaining credits
- Workspaces
- Team members
- Billing cycle
- Renewal date
Users can also click Upgrade plan if they need more credits, more usage, or higher plan features.
Usage Record
The Usage records area shows recent credit deductions.
Each record shows the task or chat name and the number of credits used. This helps users track which prompts, tasks, or AI actions consumed credits.
How to Check if Credits Look High
If credits look higher than expected:
- Check which mode was used.
- Check whether the task included file processing.
- Check whether code or website generation was included.
- Check whether execution was performed.
- Check whether multiple follow-up steps were used.
- Compare estimated credits before execution with final usage after completion.
Website Usage & Billing
The Website usage & billing option opens the full usage and billing log.

This log includes:
- Date
- Details
- Credits
- Tokens
- Mode
- Count Type
Users can review this log to understand detailed credit usage for completed chat turns and older entries.
Cancel Subscription
If a paid subscription is active, users can see a Cancel subscription option.
When the user clicks it, Odoo Pilot shows a confirmation popup. The user can either keep the subscription or confirm cancellation.

Connectors
The Connectors section is used to manage external account connections such as GitHub and Figma.
These connectors help Odoo Pilot work with source code, repositories, design files, and website design references.
GitHub Connector
The GitHub connector allows users to connect multiple GitHub accounts for code-related workflows.

Users can:
- Add multiple GitHub accounts
- Manage linked GitHub accounts
- View connected GitHub account details
- Disconnect a linked GitHub account
Odoo Pilot shows an account picker when adding another GitHub account. Users do not need to log out of GitHub first.
This connector is useful for Module Builder and Website Builder work where generated code needs to be pushed, pulled, reviewed, or linked with a repository.
Repository Management
Overview
Repository Management helps users organize generated Odoo module code, connector files, and website assets in GitHub.

Creating a New Repository
- Open the required project.
- Confirm GitHub is connected.
- Open the GitHub or repository section.
- Choose Create New Repository.
- Enter a clear repository name.
- Select visibility.
- Create and link the repository.
Select a Branch
Use a dedicated branch for each task.
Examples:
- feature/sale-approval
- fix/module-install-error
- website/homepage-update
- connector/shipstation-sync
Avoid working directly on main unless the code is already reviewed.
Pulling Latest Code
Before generating or pushing new changes, pull the latest code from GitHub. This reduces the risk of overwriting work done by another developer.
Pushing Code
Before pushing:
- Review generated files.
- Confirm repository and branch.
- Add a clear commit message.
- Push the code.
- Verify the pushed files in GitHub.
- Test the code on staging.
Disconnecting Repository
Disconnecting a repository from Odoo Pilot should remove the link only. It should not delete the GitHub repository, branches, commits, or files.
Figma Connector
The Figma connector allows users to connect Figma so they can attach design frames and assets for website generation.
This is useful in Website Builder Mode when users want to convert a Figma design into Odoo-compatible website pages, sections, snippets, or module assets.If users need more frequent Figma usage, they can upgrade their plan.
Users can attach Figma in two ways:
- Add from Figma
- Connect Figma from Account Settings → Connectors
How to Connect Figma
To use Figma with Website Builder:

- Open Account Settings.
- Go to Connectors.
- Find Figma.
- Click Connect.
- Complete the Figma connection process.
- Return to Website Builder Mode and attach the Figma design or frame.
After Figma is connected, users can provide a Figma design URL or select a frame from the available frames.
Best Practices
- Connect the correct GitHub account before generating code.
- Use separate repositories or branches for different clients.
- Avoid pushing directly to production branches.
- Pull latest code before pushing new changes.
- Review generated files before pushing.
- Test modules on staging before production.
Credits and Usage Tracking
Overview
Odoo Pilot uses credits for AI-powered tasks, content generation, execution, file processing, and other supported actions. Users should check their available credit balance before running large or complex tasks.
Credit usage varies depending on the selected mode, task complexity, number of files, amount of generated content, and execution requirements.
Subscription Plans
Odoo Pilot provides upgrade plans for users who need more credits, more workspaces, more team members, or higher usage capacity.
Users can open the upgrade plans from:

- The Upgrade button in the top bar
- The Upgrade option in the user profile menu
- Account Settings → Usage → Upgrade plan
The upgrade popup shows available plans and allows users to compare features before choosing a plan.
Free Account Allowance
- Every new user receives 300 one-time free credits.
- These free credits help new users test Odoo Pilot features before upgrading to a paid plan.
- Free credits are limited and do not refresh like paid subscription credits unless the current plan includes a recurring credit allowance.
Subscription Credits
Subscription credits are credits included with the selected plan.

They can be used for supported Odoo Pilot actions, including:
- Chat responses
- Estimates and gap analysis reports
- Mockup generation
- Implementation tasks
- File processing
- Module generation
- Website generation
- Pilot Studio actions
- Execution-related tasks

Subscription Credit Validity
Subscription credits are valid for 30 days from the date they are issued.
When the subscription renews, the account receives the credits included with the active plan for the new billing cycle. Any subscription credits that reach the end of their 30-day validity period will expire, even if they have not been used.
Users should therefore monitor their remaining credits and use them before their expiry date.
Add-On Credit Purchases
Add-on credits are additional credits purchased separately from the main subscription plan.
Users can purchase add-on credits when their subscription credits are insufficient for:
- Large implementation tasks
- Additional estimates or mockups
- Module development
- Website generation
- File-heavy processing
- Pilot Studio execution
- Other high-usage activities
Purchased add-on credits are added to the account’s Remaining Credits balance.
Add-On Credit Validity and Rollover
Add-on credits do not expire.
Unlike subscription credits, they are not limited to a 30-day billing cycle. Any unused add-on credits remain available in the account until they are consumed.
This means users can purchase additional credits for future work without losing them at the end of the current subscription period.
Users can check the Usage section to review their total remaining balance and confirm the credits available on their account.
What Happens to Credits During a Plan Upgrade
When a user upgrades to a higher subscription plan, any remaining valid credits from the previous plan are rolled over and remain available alongside the credits provided by the new plan.
However, rolled-over subscription credits keep their original 30-day validity period.
For example, if credits from the previous plan have 10 days of validity remaining at the time of the upgrade, those credits will remain available for those 10 days. Upgrading the plan does not restart or extend their expiry period.
Add-on credits are not affected by a plan upgrade and remain available without expiry.
After upgrading, users should review the Usage page to confirm:
- Current subscription plan
- Remaining credits
- Newly added plan credits
- Credit validity or expiry
- Workspace limit
- Team member limit
- Subscription renewal date
Usage Summary in the Profile Menu
The user profile menu displays a quick summary of:
- Current plan
- Available credits
- Workspace usage
- Team member usage
- Upgrade option
This allows users to quickly review their plan and available capacity without opening the complete Usage page.
Best Practices
Before upgrading, users should review their current usage, remaining credits, workspace limit, team member limit, and upcoming credit expiry.
Choose a plan based on actual usage requirements:
- Use a smaller plan for light pre-sales work, mockups, and smaller Odoo tasks.
- Use a higher plan for regular implementations, module generation, website development, and team collaboration.
- Purchase add-on credits when temporary extra capacity is required without changing the subscription plan.
For better credit control:
- Provide complete and detailed prompts.
- Attach only the files required for the task.
- Avoid repeatedly generating the same output.
- Review tasks before approving execution.
- Check usage records after large tasks.
- Use subscription credits before their 30-day validity expires.
- Keep add-on credits available for temporary usage increases or future projects.
Users should always review the Usage page after upgrading or purchasing add-on credits to confirm that their balance and account limits have been updated correctly.
Help & Support Tickets
The Help & Support option is available from the floating support icon on the bottom-right side of the workspace.
Users can use Help & Support to create a new support ticket, review existing tickets, track ticket status, and continue the conversation with the support team.
How to Create a New Ticket
The New Ticket tab is used to submit a new support request.

Users can select an issue type such as:
Bug / Error
Odoo Connection
AI Response Issue
Execution / Rollback
Billing
Data Import Issue
Feature Request
Other
Users can also choose a priority level:
Low
Medium
High
Critical
After selecting the issue type and priority, users should add a clear subject and click Next: Add Details.
Add Ticket Details
After clicking Next: Add Details, users can describe the issue in detail.

This area includes:
Describe your issue
Attachments
Browse Files
Back
Cancel
Submit ticket
Users can attach files such as screenshots, PDFs, or images. Attachments help support understand the issue faster.
After adding the details and attachments, users can click Submit ticket.
My Tickets
The My Ticket tab shows submitted support tickets.

Users can:
Search tickets
Filter tickets by status
Open a ticket
Review ticket details
Check ticket priority
Check ticket status
Continue conversation with support
Ticket status shows values such as Waiting on Support.
When to Create a Support Ticket
Users should create a support ticket when they need help with:
Platform bugs or UI issues
Odoo connection problems
AI response issues
Failed execution
Rollback issues
Billing or credit questions
Data import problems
Missing or incorrect generated files
Feature requests
Unexpected errors
Best Practices
When creating a support ticket, provide clear details so the support team can understand the issue quickly.
A good support ticket should include:
Clear subject
Issue type
Correct priority
Project or chat name if relevant
Mode used, such as Implementation, Pilot Studio, Module Builder, Website Builder, or Odoo Ask
What the user expected
What actually happened
Screenshot or attachment if available
Error message if any
Steps to reproduce the issue
Providing complete details helps reduce back-and-forth messages and allows support to investigate the issue faster.
Branch Management and Long Chats
Odoo Pilot allows users to create a branch from an existing chat. A branch starts a new chat from the selected point while keeping the original chat unchanged.
Why Odoo Pilot Suggests a Branch
When a conversation becomes very long, Odoo Pilot suggests creating a branch. This keeps the work focused and avoids carrying too much old context into new responses.
Long chats include:
- Many prompts
- Large task outputs
- Execution logs
- Retries
- File reviews
- Implementation steps
- Code generation history
- Multiple unrelated follow-up questions
Creating a Branch from a Response
Users can see a Branch option near a response.
When the user clicks Branch, Odoo Pilot opens the Create branch popup.

The popup includes:
- Branch title
- Cancel
- Create branch
The branch title is usually generated from the current chat or response, but users can edit it before creating the branch.
After clicking Create branch, Odoo Pilot creates a new chat with the conversation history up to that point. The original chat remains unchanged.

When to Use a Branch
Use a branch when:
- The task enters a new phase
- The user wants to test a different approach
- The user wants to continue from a specific response
- The original chat should remain unchanged
- The current chat has too many old logs, retries, or unrelated tasks
Best Practices
- Use branches to keep Odoo Pilot chats organized.
- Create a branch when moving to a new phase, testing a different solution, or continuing from a specific response. Use a clear branch title so it is easy to identify later.
- Branching helps Odoo Pilot stay focused, reduces unnecessary context, and can make future responses cleaner and more accurate.
Pilot Agent Selection
Odoo Pilot allows users to choose the agent/model level used for a task.
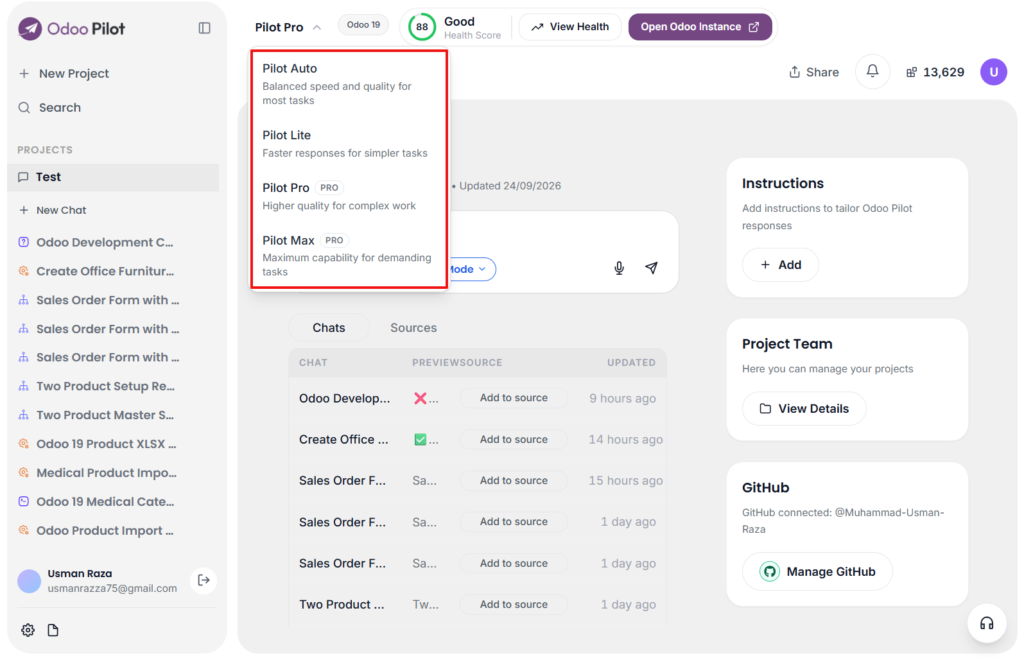
Available options may include:
- Pilot Auto
- Pilot Lite
- Pilot Pro
- Pilot Max Pro
Credit Usage Impact
Yes, the selected agent/model can affect credit usage.
Higher-capability agents consume more credits because they are designed for more complex reasoning, larger context, code generation, execution planning, and detailed outputs.
Pilot Auto uses different agent/model levels depending on the task complexity, so credit usage can vary from one task to another.
Credit usage also increases when the task includes:
File processing
Long conversation context
Planning and subtasks
Odoo-side execution
Code generation
Website or module generation
Multiple retries or reimplementation steps
Best Practices
If credit usage seems higher than expected:
Check which agent/model was selected: Pilot Auto, Pilot Lite, Pilot Pro, or Pilot Max Pro.
Remember that Pilot Auto automatically selects the best available agent/model for the task, so credit usage varies based on task complexity.
Review whether the task included planning, execution, file generation, code generation, database actions, or multiple follow-up steps.
Check the credits shown before execution and the final credit usage after completion.
For lower credit usage, users should choose the right agent for the task and provide complete requirements in the first prompt to avoid unnecessary retries.